Posted in Menu / Navigation, Power Apps Portals

Power Apps Portals – Adding Parameters in Menu Links

My friend Franco Musso recently wrote a blog post where he shows a few options on what you can do with Custom URL parameters: https://francomusso.com/custom-url-query-parameters-for-your-power-apps-portals.

That blog post has inspired me to write this article, but in here I will be talking about a step before. I will show how to customize the Web Link entity table along with the Header Web Template and get the custom query parameters added once the menu is loaded.

First step is to add a custom attribute column to the Web Link table. I will call it Parameters and add to the form in my Model-Driven App (the format of this should be param1=value,param2=value…..):

Now we need to change the existing Header Web Template to add those parameters in the menu. The changes here should be made where the link <a> element is rendered (circa line 37 in the OOB code):

Here is the liquid code highlighted and an explanation of the changes:

{% if link.cr984_parameters %}
    {% assign linkParams = link.cr984_parameters | split: "," %}
{% endif %}
href="{{ link.url | escape }}{% if linkParams %}?{% for lp in linkParams %}{{ lp }}{% unless forloop.last %}&{% endunless %}{% endfor %}{% endif %}"
  • if my custom column cr984_parameters is not empty, assign an array object (comma separated values) ;
  • now when setting the href property, I am adding a ? and then looping through my parameters array, appending a & until the last position of the array;

As per my snapshot above, I am setting the Home Web Link parameters as param1=hello,param2=world.

Now once cleared the cache and just by hovering the mouse over the Home menu link, this is what I see in my browser:

The same code might need to be applied where the sublinks are rendered, but in my example I will just to it for the main Web Link (parent).

Now we can use the parameters in our page (via Liquid or JavaScript). Just for an example, I will render my parameters via Liquid in my Home Web Page:

Conclusion

Not a lot of people know this, but once making customization to the Portals data model, those changes are reflected in the Liquid objects and can be accessed via code. This is a great trick to extend Power Apps Portals capabilities. Unfortunately if you do these changes you will be limited to using the Portal Management App as this wouldn’t reflect in the Portal Studio.

Possibilities here are endless, please make sure to check out Franco’s post to see other examples of using custom parameters in your Power Apps Portals URL.

Posted in Menu / Navigation, Power Apps Portals

Power Apps Portals – Navigation Menu showing every Web Page

Have you recently come across a situation where after defining the links for your main navigation menu, it suddenly resets on its own showing every custom Web Page you’ve created? Well, in this post I am going to show you how to stop that from happening.

Behind the scenes

First, we need to understand how the menu is structured. A menu is represented by two entities in your CDS environment:

  • Web Link Set: represents a group of links, the main menu for example is represented by the Default Web Link Set
  • Web Link: represents the link to a certain page in your Portal, or an external URL, you can also define an image to be displayed and the order to be shown in your Web Link Set

For more information on managing Web Link Set/Web Link, please refer to the official documentation: https://docs.microsoft.com/en-us/powerapps/maker/portals/configure/manage-web-links.

Finally these entities are represented as custom Liquid objects, being rendered in the Header or Footer Web Template.

What is causing this menu reset?

Now let’s understand exactly what is happening with the Portals.

Microsoft is making a lot of investment in Portals Studio app (https://docs.microsoft.com/en-us/powerapps/maker/portals/portal-designer-anatomy) adding lots of new features on a regular basis. Personally, I am not a big fan of the Portals Studio and I still go to the classic Portal Management app. If you are new to the Portals or just want to quickly update certain content, I completely agree that the Portals Studio interface is much easier and intuitive to make simple changes.

One important (and hidden) feature of the Portals Studio app, is that it automatically refreshes the Default Web Link Set with any custom Web Page you may have created. It doesn’t matter if you’ve created the Web Page via Portal Studio or Portal Management, this seems to happen on the onload event of the Portals Studio, but at the same time it doesn’t show you straight away, only after refreshing the Portals Studio page.

A bit confusing? Let’s try to replicate the issue step-by-step:

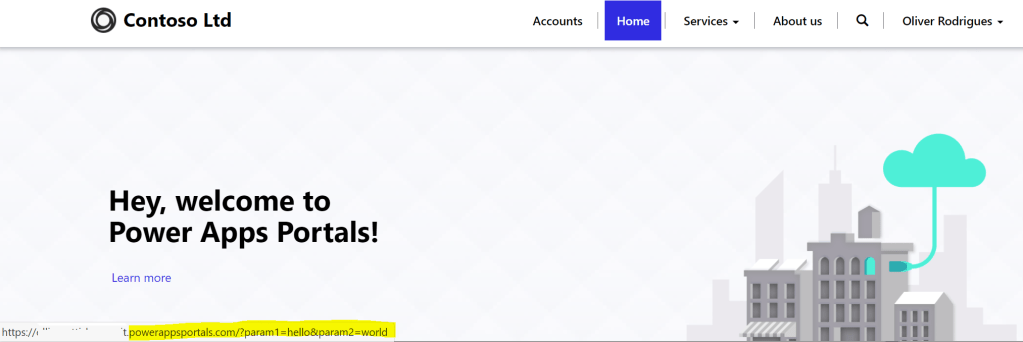
  • Open two tabs in your browser, one with your Portals website and the other the Portal Studio App, at this moment the navigation menu should be identical in both tabs
  • Create a new Web Page (can be a blank page), sync and refresh first just the Portals website
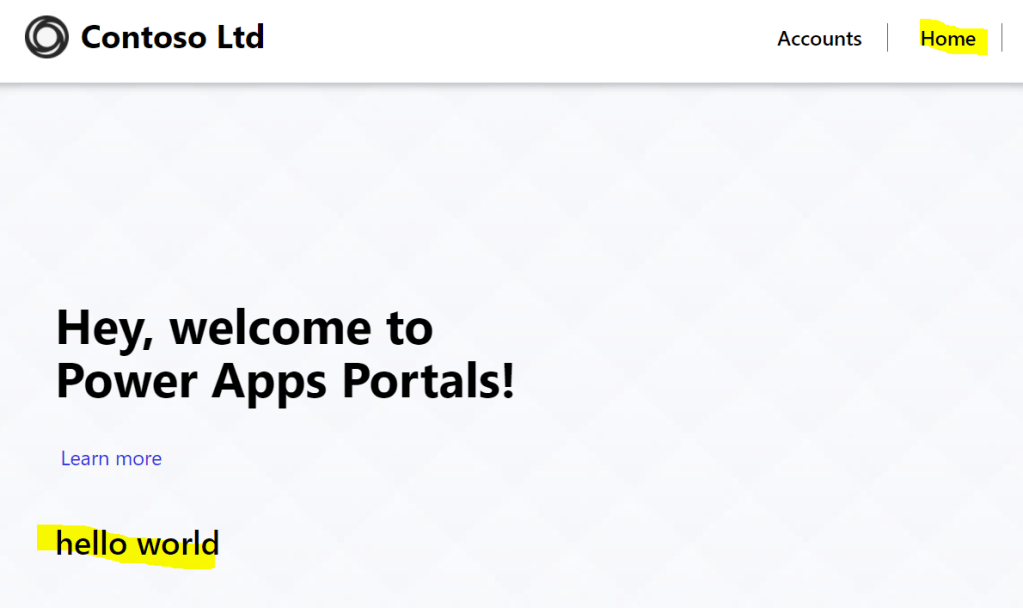
  • Now your new Web Page is present in the menu

Now let’s go to the Portal Management App, navigate to the Web Link Set and open the Default Web Link Set. In the Web Links tab, you will see the recently created Web Page there as a new Web Link, even though you didn’t want it to be shown there.

Got it, now what’s the solution?

I know the above text was a bit long, but I think it is important to understand what’s happening in the background. There are a few ways to fix this.

Within the Portals Studio, you can hide the page from showing in the menu, what this will do is deactivate the Web Link record in the CDS, so it won’t show in the menu anymore. Just go to Pages, select the ellipses (…) on your page and click Hide in default menu:

But the problem is still there, if you create new pages it will keep adding to the menu. To get rid of this behavior, we need to change the reference to the Web Link Set. Let’s just forget about the Default Web Link Set and leave the Portals manage it the way it wants, we will be using the Primary Navigation Web Link Set for our menu. In the Portal Management App add/remove any links you want in your menu.

Once the menu has been defined in the Portal Management App, we need to set the Portals to use that Web Link Set, there are two ways of doing this. Please read the entire post before actually making any change in your environment:

Set Navigation Menu via Portals Studio

Open the Portals Studio and click on the main menu, and on the right-hand pane, change the navigation menu dropdown:

Click sync configuration and you’re done!

Set Navigation Menu via Portal Management App / Header Web Template

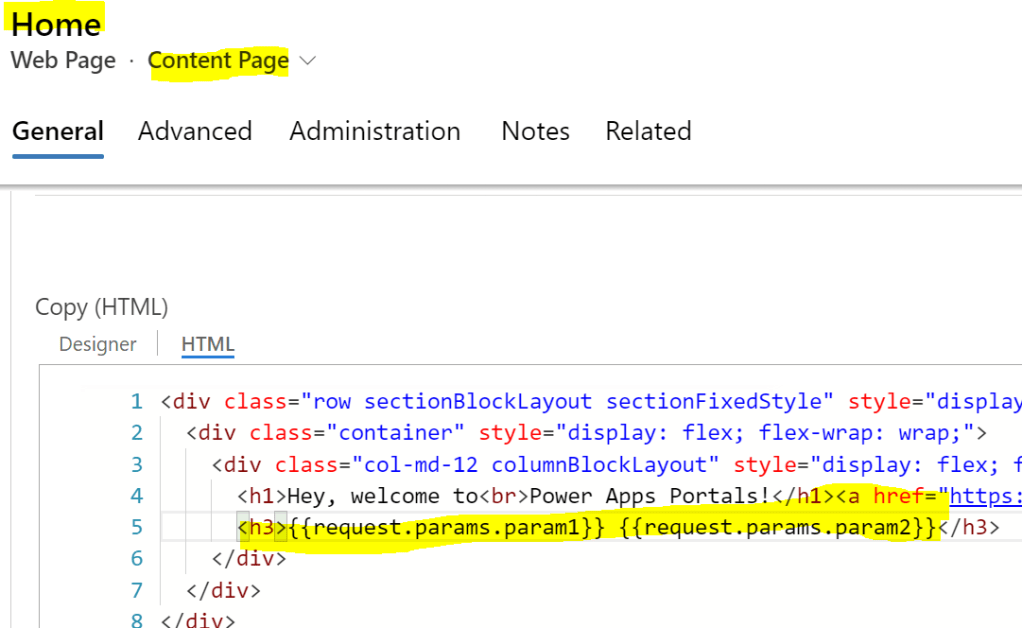
Go to the Web Templates, open the Header record. Simply change the reference to the Web Link Set, locate the line below, and replace Default for Primary Navigation:

Now clear the cache and don’t worry about this issue again.

Which method should I use?

One thing I noticed is that when changing the navigation menu via Portals Studio, the Portals automatically resets the Header Web Template with the OOB code, changing only the line mentioned above. If you haven’t made any customization in your Web Template, this won’t be an issue, and it is probably easier to change, but if you have made any changes in the Liquid code, you definitely don’t want to lose them, so you’re better off making the change manually in the Web Template.

Apparently this was a bug and it is now fixed in the version 9.2.5.x, although I currently find anywhere in the release notes, when testing this was now updating only the weblinkset assignment, instead of the entire Web Template

Update on 20th July 2020

I see a lot of people having issues with the menu navigation where the pages keep being added, I hope this post clarifies why this is happening and how to solve it.

Posted in Menu / Navigation, Power Apps Portals

Power Apps Portals – Navigation Menu: Setting up a tree structure menu

Hi

In Power Apps Portals, the main navigation menu is represented by the Web Link Set and Web Link objects (entities). A Web Link contains a reference to a Web Page from the Portal or an external URL. The Web Link Set contains a group of Web Links, and can be placed via Liquid template in the Portal.

When setting up Power Apps Portals, by default, it comes with with a few Web Link Sets pre-defined. The Default Web Link Set is used as the primary menu in your Portal. For a better understanding of all the properties of Web Links and Web Link Sets, please refer to the following documentation: https://docs.microsoft.com/en-us/powerapps/maker/portals/configure/manage-web-links.

The way the menu is rendered by default, we cannot have sub-menus or a title to split Web Links. In this post, I will show you a quick tip on how to setup a tree structure for your Portal menu/primary navigation, something like this:

MENU
– – – – – – – – – – – –
 TITLE 01
LINK A
LINK B
 TITLE 02
LINK A
LINK B

Implementation

To achieve this, I am going to make customizations in the Web Link entity. There is no problem modifying the OOB Portal entities, just make sure you add any changed objects to an unmanaged solution when moving to other environments, you can’t export the Portals solution as it is a managed solution.

The code that renders the menu is in Liquid Template, and it’s placed in the Header Web Template, we will also make a few changes there.

By default, if you add a custom field to your Portal entities, it will be reflected in the Liquid objects, so you can easily access the value without writing additional code.

If for some reason you prefer not to change the entity, that's fine, another approach would be when creating your Web Link record, add some tag in the name (for example *menu-title*)

Now let’s jump into the customization:

  • Create a new field in the Web Link entity (I am calling “Display as Title”)
  • Add the new field to the Web Link form
  • I am leaving Page / URL blank, additionally if you want you could add a business rule to hide/show those fields according to the Display as Title value
  • Now open your “Header” Web Template, I am changing the code with the following logic:
    • If my custom field “ollie_displayastitle” is true, display the link as a title instead of an <a> element
    • In my example, I am using a <strong> element, but you could use anything here, preferably you should also add a class from your CSS to get a better look & feel
    • If you didn’t create the custom field and are using the tag like I mentioned *menu-title*, your if condition will be {% if sublink.name contains “*menu-title*” %} and then you also need to remove that using liquid filter {{ sublink.name | remove: “*menu-title* “}}
  • This snippet of code can be found on the line 62 for the Header Web Template (OOB Portals):
 {% for sublink in sublinks %}
  <li role="none">
    {% if sublink.ollie_displayastitle %}
      <strong>{{ sublink.name | default:sublink.title | escape }}</strong> 
      <!-- this can be any element type -->
    {% else %}
      <a 
        role="menuitem" 
        aria-label="{{ sublink.name | default:sublink.title | escape }}" 
        href="{{ sublink.url }}" 
        {% if sublink.Open_In_New_Window %} 
          target="_blank" 
        {% endif %} 
        {% if sublink.nofollow %}
          rel="nofollow" 
        {% endif %} 
        {% if sublink.tooltip %}
          title="{{ sublink.tooltip | escape }}"
        {% endif %}>
        {{ sublink.name | default:sublink.title | escape }}
      </a> 
    {% endif %}
  </li>
{% endfor %}
  • This is the final result:

Conclusion

By customizing Portal entities and existing Web Templates, we are not only making customization to the Portals but also extending its original functionality.

This post idea came after seeing a few questions on the communities about changing the way the menu is rendered. I hope this post encourages you to make changes to the way the menu is rendered OOB.