Power Pages gives us the ability of adding a search option to Lists out of the box, which is a great functionality if you consider the effort if we had to implement this manually.
By default, the search looks for the exact match on all columns available in the List, and if you need to use a LIKE operator, you need to add a wildcard (*) to the search term.
If you are coming from a Dynamics 365 background, you are probably very familiar with this behaviour, but when thinking of external users, this might not be the case, and the experience may not be natural to users.
In this quick article I want to share a JavaScript code that will automatically inject an * to the search term whenever the user performs a search. Initially when trying this out I thought it would be a lot easier than it actually was, so here I will explain all the functions and the logic behind the code:
AddSearchWildcard: This function will get the text input element for the search, and add a * in the start of the search term
ClearWildcardSearch: This function will remove the * from the text input so it all looks transparent to the user
ClearSearchTooltip: By default, we have a tooltip explaining to the user to add a *, however this is not necessary, so this function complete removes the tooltip.
BindFirst: This function is used to enforce that our AddSearchWildcard function will be executed prior to the search itself
document.ready: Finally on document ready the we are registering the BindFirst Function and adding the necessary functions to the appropriate event listeners.
And the full code is:
$(document).ready(function () {
    $.fn.bindFirst = BindFirst;
    var list = $(".entitylist.entity-grid").eq(0);
    list.on("loaded", function () {

        var searchButton = $('.entitylist-search > div.input-group-btn > button');
        searchButton.bindFirst("click", AddSearchWildcard);
        searchButton.on("click", ClearWildcardSearch);
        ClearSearchTooltip();
    });
});

function AddSearchWildcard() {
    var queryInput = $("input.query");
    var queryInputValue = queryInput.val();
    if (!!queryInputValue && !queryInputValue.startsWith("*")) {
        $(queryInput).val("*" + queryInputValue);
    }
};

function ClearWildcardSearch() {
    var queryInput = $("input.query");
    var queryInputValue = queryInput.val();

    if (!!queryInputValue && queryInputValue.startsWith("*")) {
        queryInput.val(queryInputValue.substring(1, queryInputValue.length));
    }
}

function ClearSearchTooltip() {
    var queryInput = $("input.query");
    queryInput.attr("aria-label", "");
    queryInput.attr("data-original-title", "");
};

function BindFirst(eventName, eventHandler) {
    var elem, handlers, i, _len;
    this.bind(eventName, eventHandler);
    for (i = 0, _len = this.length; i < _len; i++) {
        elem = this[i];
        if (!!elem.tagName && elem.tagName == "BUTTON") {
            handlers = $._data(elem).events[eventName.split('.')[0]];
            handlers.unshift(handlers.pop());
        }
    }
}
Conclusion
This solution is great to enhance the user experience when searching within Lists, however keep in mind that this performs a server-side search on every column available in the list, so if you have too many columns and records on your list this might decrease your Portal performance. Before publishing this make sure that your list is already optimized with only necessary columns.
Basic Forms and Advanced Forms in Power Pages are an amazing way to quickly expose Dataverse data to external users for data manipulation.
The way Power Pages works is by reading the Dataverse form metadata to render the controls on the page. Using Basic Form/Advanced Form Metadata, Power Pages also allows us to control styling and behaviour to controls.
One common question I receive is how to convert a dropdown into a autocomplete control, and that’s what we’ll see in this post. Here is an example of what we are about to achieve:
It’s probably obvious, but worth mentioning that this logic is only applicable for the following type of controls:
Choices (OptionSet)
Lookups (rendered as dropdown via metadata)
I will describe here what my code below is doing, and the things I have considered when putting this together:
The function ConvertSelectToAutocomplete takes two arguments:
selectName: the schema name of your column (i.e. primarycontactid)
selectPlaceholder: optional parameter if you want a placeholder text when it’s blank (i.e. Please start typing…)
The function will copy a few elements from the original select element, for example Classes and Readonly attributes
Then I am creating a new <input> element pointing to an empty <datalist> and adding this element to the page
Now what I do is loop through all <option> within the original <select> element and add the options to the new datalist
The original <select> element is no longer necessary, so we can hide it from the page with a .hide()
All actions above are sufficient to convert your dropdown to a HTML5 autocomplete dropdown, but there are still a few more things to get the full solution working properly:
If the record being opened already contains value in the Choices/Lookup column, we need to make sure to populate with the original value. For this we will check the current value and try to find the correspondent item within the dataset
The last action here is to attach a logic to the OnChange event, the reason for this is that we need to make sure to keep the original column element in the page up to date with the newly selected value as in the form submit is the original element that will be sent to the server
Before we get to the full code, it’s important to note a few things:
Dataset value
The control uses a dataset for holding the options available in the dropdown. The dataset value attribute is the text displayed within the dropdown, so I am creating a separate data-value to hold the actual id/value of the item
Because of that, every time we need to get the data-value, it has to be done by finding the element within the dataset list (by text)
In other words, for this to work properly, your dataset needs to have unique texts, otherwise it might find the wrong item
Invalid entry
By default, this control allows you to add an entry that is not listed within the dataset, so we need to prevent this from happening
In my code, what I am doing is simply ignoring and removing the selected text, however you can add an error message in the code if it you prefer
$(document).ready(function () {
    ConvertSelectToAutocomplete("<your optionset/lookup dropdown here>");
});

function ConvertSelectToAutocomplete(selectName, selectPlaceholder) {
    selectPlaceholder = selectPlaceholder ?? "";
    var selectElement = $("#" + selectName);
    var selectElementClass = selectElement.attr("class");
    var readonly = $(selectElement).attr("readonly") ?? "";
    var autoCompleteElementId = selectName + "-autocomplete";
    var autoCompleteDatasetId = selectName + "-data";
    var autoCompleteElement = '<input name="' + autoCompleteElementId + '" id="' + autoCompleteElementId + '" class="' + selectElementClass + '" list="' + autoCompleteDatasetId + '" placeholder="' + selectPlaceholder + '" ' + readonly + '><datalist id="' + selectName + '-data"></datalist>';
    var options = "";

    $(selectElement).parent().append(autoCompleteElement);
    $("#" + selectName + " option").each(function (index, o) {
        options += '<option data-value="' + o.value + '" value="' + o.text + '"/>';
    });
    $("#" + autoCompleteDatasetId).html(options);

    $(selectElement).hide();

    var currentSelectedValue = $(selectElement).val();
    if (!!currentSelectedValue) {
        $("#" + autoCompleteElementId).val($(selectElement).find("option:selected").text());
    }

    $("#" + autoCompleteElementId).on("change", function () {
        var selectedValue = $("#" + autoCompleteDatasetId + " option[value='" + $("#" + autoCompleteElementId).val() + "']").attr("data-value");
        selectElement.val(selectedValue);
        if (typeof selectedValue === "undefined") {
            $("#" + autoCompleteElementId).val("");
            // optionally you can add an error message here
        };
    });
};
Conclusion
This is a nice client-side script logic to enhance the user experience in your Portals. I probably wouldn’t use this in every scenario, if you have just a few options like Yes/No/Blank, I would probably not use this; but if your list goes beyond that with 10+ options, this might improve the way users are filling in forms.
Microsoft has released a while ago a new PluginExecutionContext class that contains additional details related to Power Apps Portals. This is very useful if you need to identify if the operation is coming from the Portals and to identify the User (Contact) that is performing the action.
The usage of this is very simple, just initiate a new object for the IPluginExecutionContext2 class and you can get access to the IsPortalsClientCall and PortalsContactId properties:
using Microsoft.Xrm.Sdk;
using System;

namespace OR.Plugins
{
    public class PortalPlugin : IPlugin
    {
        public void Execute(IServiceProvider serviceProvider)
        {
            IPluginExecutionContext2 context = (IPluginExecutionContext2)serviceProvider.GetService(typeof(IPluginExecutionContext2));

            bool isPortalsCall = context.IsPortalsClientCall;

            if (isPortalsCall)
            {
                Guid portalsContactId = context.PortalsContactId;
                if (portalsContactId == Guid.Empty)
                {
                    // anonymous
                }
                else
                {
                    // authenticated
                }
            }
            else
            {
                // not coming from portals
            }
        }
    }
}
In the below example, I am creating a task related to the current record (Account in my case) and setting details in the subject of the task as if this is coming from the Portals or not:
using Microsoft.Xrm.Sdk;
using System;

namespace OR.Plugins
{
    public class PortalPlugin : IPlugin
    {
        public void Execute(IServiceProvider serviceProvider)
        {
            IPluginExecutionContext2 context = (IPluginExecutionContext2)serviceProvider.GetService(typeof(IPluginExecutionContext2));
            IOrganizationServiceFactory serviceFactory = (IOrganizationServiceFactory)serviceProvider.GetService(typeof(IOrganizationServiceFactory));
            IOrganizationService orgService = serviceFactory.CreateOrganizationService(context.UserId);
            string subject = "";

            bool isPortalsCall = context.IsPortalsClientCall;

            if (isPortalsCall)
            {
                Guid portalsContactId = context.PortalsContactId;
                if (portalsContactId == Guid.Empty)
                {
                    subject = "Coming from Portals - Anonymous user";
                }
                else
                {
                    subject = $"Coming from Portals - Authenticated user: {portalsContactId}";
                }
            }
            else
            {
                subject = "Not coming from Portals";
            }

            Entity followup = new Entity("task");

            followup["subject"] = subject;
            followup["scheduledstart"] = DateTime.Now.AddDays(7);
            followup["scheduledend"] = DateTime.Now.AddDays(7);
            followup["regardingobjectid"] = new EntityReference(context.PrimaryEntityName, context.PrimaryEntityId);

            orgService.Create(followup);
        }
    }
}
Then when updating my Account record in three different ways (Model-Driven App / Portals authenticated / Portal unauthenticated), here is the result:
Hope this tip is useful for you and your Power Apps Portals/Dataverse implementation.
Following up on a comment from another post: Custom Lookup filter, I feel like this deserves its own dedicated article.
A Lookup column in a Basic Form/Advanced Form in Power Apps Portals is represented in a Web Page by a web control that contains a modal associated to it. This modal gives us the ability to select and filter records for that entity.
If your Lookup column is empty, when clicking on the magnifying glass, the Portals will automatically select the first record:
This behaviour might not be what you are looking for, so in this article I wanted to share a simple JavaScript code that will untick the default value, unless the lookup column already contains data:
$(document).ready(function () {

    var modalList = $("#cr285_customerlookup_lookupmodal").find(".entity-lookup").find(".entity-grid").eq(0);
    modalList.on("loaded", function () {
        var lookupValue = $("#cr285_customerlookup").val();
        if (!!!lookupValue) {
            var selected = modalList.find("table tbody > tr.selected");
            $(selected).find("td[data-th=Select] > span[role='checkbox']").click()
        }

    });
});
Also worth mentioning that this is not removing the record/row from the table within the modal. It is simply deselecting the record.
I hope this helps with your Power Apps Portals implementation.
Update December 2022
I just heard from Microsoft that this has now been fixed and shouldn’t be an issue. This articles is still relevant for injecting code to the lookup window, so I will keep the article here.
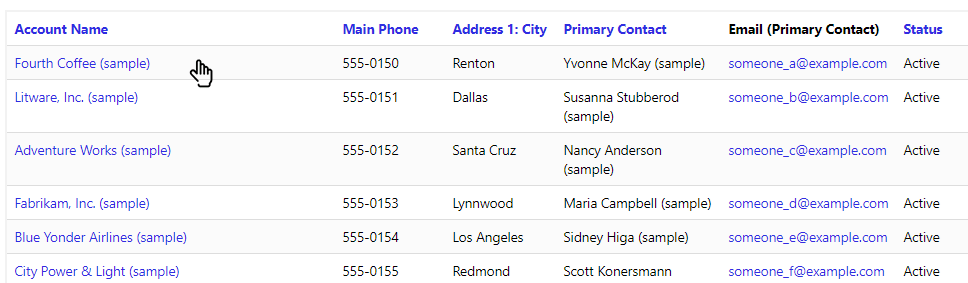
When creating a page containing an Entity List (or just List) in Power Apps Portals, it is very common to add a details page so users can drill-down to the records details.
The list is represented as below example:
By default, the first column contains the link to the details Web Page as well as the action menu on the right dropdown.
In this post, I will share two options for JavaScript/jQuery code to make the entire row clickable.
Solution 1 – Making each cell clickable
In this example, we will perform the following:
Loop through the list, retrieving the URL for record details each row
Then we will loop through each individual cell, and attach an <a> element to represent the link
The code also needs to ignore the TD containing the dropdown (optionally this can be removed)
SetLinkAllCells = function () {

    var entityList = $(".entitylist.entity-grid").eq(0);

    entityList.on("loaded", function () {
        entityList.find("table tbody > tr").each(function (index, tr) {

            var primaryColumn = $(tr).find('td')[0];

            /// or retrieve column by name
            /// var primaryColumn = tr.find('td[data-attribute="name"]');

            var url = $(primaryColumn).find("a")[0].href;
            console.log("URL: " + url);
            if (!!url) {
                $(tr).find('td').each(function (index, td) {
                    /// ignore action menu / dropdown
                    if ($(td).attr("aria-label") == "action menu")
                        return;

                    var cellValue = $(td).text();
                    /// clear td value
                    $(td).text("");
                    var newElement = '<a href="' + url + '" class="details-link has-tooltip" data-toggle="tooltip">' + cellValue + '</a>';
                    $(td).append(newElement);
                });
            }
        });
    });
};
Solution 2 – Making the table row clickable
In this example, we will perform the following:
Loop through the list, retrieving the URL for record details each row
Attach a new function to the click event of the row, redirecting the user to the URL
Remove the action menu, as this will also be triggered on the row click event
Set the cursor to pointer for better UX
SetLinkAllRow = function(){
    var entityList = $(".entitylist.entity-grid").eq(0);

    entityList.on("loaded", function () {
        entityList.find("table tbody > tr").each(function (index, tr) {

            var primaryColumn = $(tr).find('td')[0];

            /// or retrieve column by name
            /// var primaryColumn = tr.find('td[data-attribute="name"]');

            var url = $(primaryColumn).find("a")[0].href;
            console.log("URL: " + url);
            if (!!url) {
                $(tr).css("cursor","pointer")
                // remove menu dropdown
                $(tr).find('td[aria-label="action menu"]').remove();

                $(tr).click(function(){
                    window.location.href = url;
                });
            }
        });
    });
};
Now all we need is to use the preferred method:
$(document).ready(function () {
    //SetLinkAllRow();
    // or
    //SetLinkAllCells();
});
Conclusion
Each method might suit different needs, you might also consider ignoring cells that already contain a clickable value, for example e-mail address or phone number columns.
Also if your action menu contains several actions, such as delete / start a workflow, etc, the solution might need a bit of a tweak.
In general, this can be a quick win to improve UX in your Power Apps Portals implementation.
Entity Lists are a powerful feature from Power Apps Portals to quickly expose data from Dataverse. But loading a large set of data can lead to a terrible user experience if the page keeps loading for a long period of time.
In this article, I will show a trick on how to basically not load the data until the user has applied a filter to the list.
Data and Entity List setup
For this example, I have the following setup:
Account table with over 1000 records;
Web Page showing an Entity List;
Entity List pointing to the Account table, Page Size = 500 and Metadata Filter enabled on the Account name.
When opening my page, this is taking and average of 9 seconds to render, which can be quite a lot and depending on the internet connection this could be even worse.
Entity List – Metadata Filter
Now it’s time for a hidden trick with regards Metadata Filtering. We can actually pre-inject values to the URL and this will be applied before loading the list itself. The format must be the following:
?mf=0=firstvalue%261=secvalue%262=thirdvalue…
Let’s breakdown and understand the meaning of that:
? this just separates the main URL from its parameters, basic web stuff here;
mf= means the Metadata Filter, and whatever follows is the value of the mf parameter;
0 means the index of the filter;
=firstvalue assigns the first filter value to “firstvalue”;
optionally if you have multiple filter attributes:
%26 this is the ASCII code for the char &, so basically it is appending multiple parameters;
1 means the index of the second filter;
=secvalue assigns the second filter value to “secvalue”;
and you can keep going if you want…..
In my example, I only have only filter, so let’s see what happens when I try to load the page by adding the parameter in the url:
Power Apps Portals is reading my URL and automatically assigning a value to the first filter, all this happens at the server-side level and the page is loaded super quick (less than a second).
I decided to generate a GUID value as I would never have an account with that name, but you could use anything you want here.
Clear the value in Metadata Filter
We are almost there, final step is to clear the value that is present in the Filter on the load of the page, this can be achieved by the following JavaScript/jQuery code:
  $(document).ready(function(){
    ClearFilter();
  });

  function ClearFilter(){
    var params = new URLSearchParams(window.location.search);
    var mf = params.get("mf"); // metadata filters
    if(mf === "0=0eaf2b2b-be3a-4c3c-9e52-1c03431c0d9f"){
      $("#0").val("");
      var listAccounts = $(".entitylist.entity-grid").eq(0);
      listAccounts.on("loaded", function () {
        listAccounts.find(".view-empty.message").text("Please enter a filter criteria to find an Account record!")
      });
    }
  };
Let’s explore what the code is doing:
Retrieve the URL Parameters;
Retrieve the mf parameter;
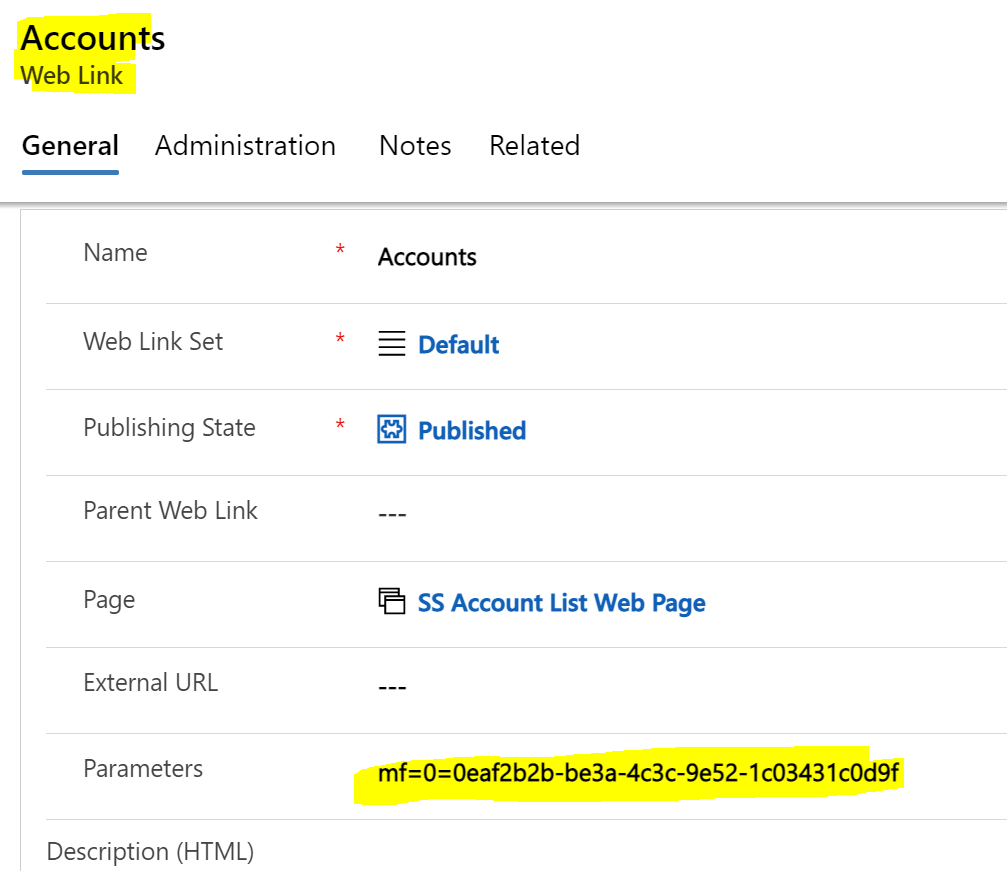
Check the value for my 0 indexed filter. This is the same value as entered previously in my Web Link – note that you could use anything here, as long as they match;
If it’s a match, clear the value for the element with id 0 – by default, metadata filters are rendered being assigned the id the same as the filter index;
Via Entity List, we can setup the message for empty list, but not for “record not found”. This would be possible to change via Content Snippet, but that would be applied to every Entity List in the Portals. For this reason I am changing the message in my list via JavaScript to indicate that the user should enter a filter criteria.
Conclusion
Loading a large set of data is a very common scenario and with very little code we can enhance the user experience by forcing them to use the filter.
Have you every solved this using a different approach? Please post on the comments the strategy you took.
That blog post has inspired me to write this article, but in here I will be talking about a step before. I will show how to customize the Web Link entity table along with the Header Web Template and get the custom query parameters added once the menu is loaded.
First step is to add a custom attribute column to the Web Link table. I will call it Parameters and add to the form in my Model-Driven App (the format of this should be param1=value,param2=value…..):
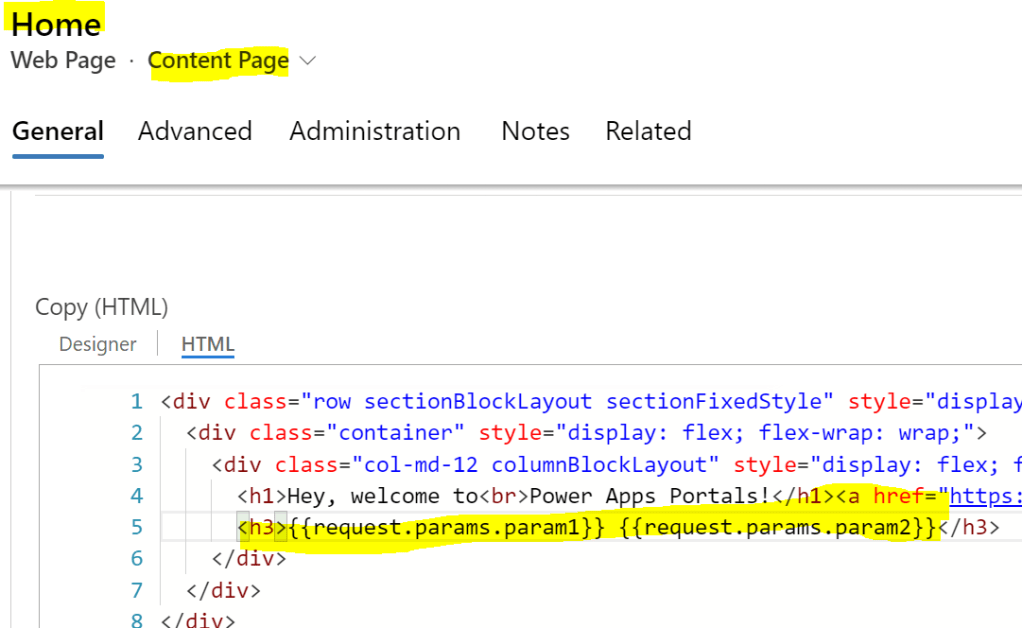
Now we need to change the existing Header Web Template to add those parameters in the menu. The changes here should be made where the link <a> element is rendered (circa line 37 in the OOB code):
Here is the liquid code highlighted and an explanation of the changes:
{% if link.cr984_parameters %}
    {% assign linkParams = link.cr984_parameters | split: "," %}
{% endif %}
href="{{ link.url | escape }}{% if linkParams %}?{% for lp in linkParams %}{{ lp }}{% unless forloop.last %}&{% endunless %}{% endfor %}{% endif %}"
if my custom column cr984_parameters is not empty, assign an array object (comma separated values) ;
now when setting the href property, I am adding a ? and then looping through my parameters array, appending a & until the last position of the array;
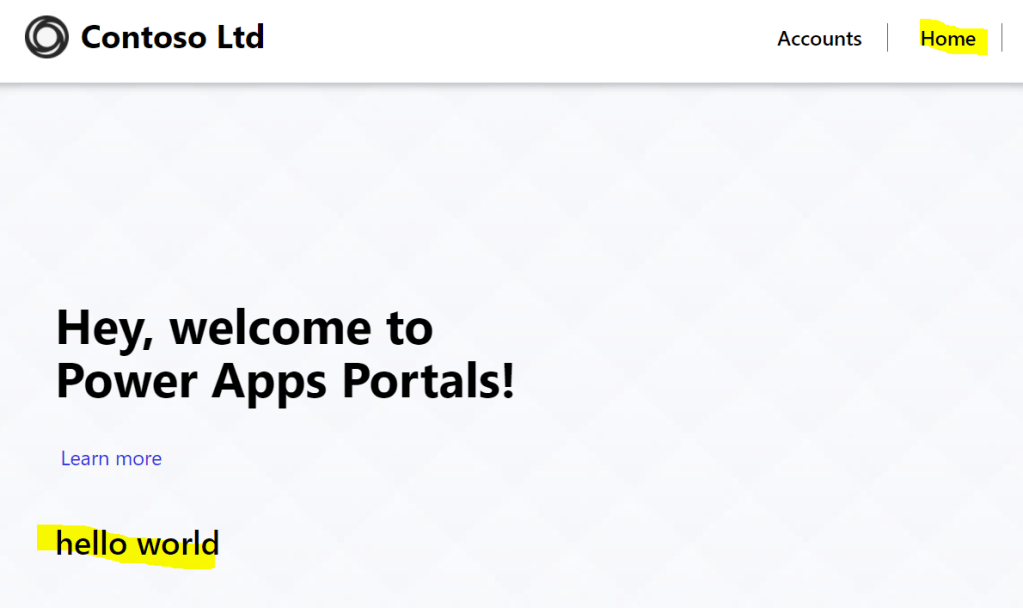
As per my snapshot above, I am setting the Home Web Link parameters as param1=hello,param2=world.
Now once cleared the cache and just by hovering the mouse over the Home menu link, this is what I see in my browser:
The same code might need to be applied where the sublinks are rendered, but in my example I will just to it for the main Web Link (parent).
Now we can use the parameters in our page (via Liquid or JavaScript). Just for an example, I will render my parameters via Liquid in my Home Web Page:
Conclusion
Not a lot of people know this, but once making customization to the Portals data model, those changes are reflected in the Liquid objects and can be accessed via code. This is a great trick to extend Power Apps Portals capabilities. Unfortunately if you do these changes you will be limited to using the Portal Management App as this wouldn’t reflect in the Portal Studio.
Possibilities here are endless, please make sure to check out Franco’s post to see other examples of using custom parameters in your Power Apps Portals URL.
A common requirement for Power Apps Portals is to add dynamic filters when we open a lookup modal. Unfortunately there is no OOB way to achieve this. It is important to state here that the Portal relies on the Lookup View from your D365/Dataverse, so if you need a static filter you can always change that view:
In this post I will show a customization using client-side code to filter the data presented on the lookup modal. But before that, I’d like to share an article by a community champion that uses a different method: https://www.dancingwithcrm.com/custom-lookup-filtering-powerapps-portal/ by Oleksandr Olashy.
The idea of the article above is to render the lookup as a dropdown, and then use JavaScript/Web Templates to perform a query and finally re-populate the options in the dropdown element.
That approach will probably be enough for most scenarios, but what if you still need to show the Lookup modal as below?:
Here are a few reasons you might want to display the Lookup modal:
If your list is a very long list, a dropdown might not be the best experience for the user;
You might want to use the search;
You might want to display multiple columns;
If you have a subgrid and have an action for Associate record, this will always open the lookup-modal.
In my example, I have an Account lookup on the Contact profile form, and the filter I want to do here is hiding certain records if the current user is not an Administrator. I will also add a flag on the Account entity to mark records that should be hidden.
Here is my Account data with no filters via Advanced Find search:
Now I will add the following JavaScript code to the Profile Web Page:
$(document).ready(function () {

    var list = $("#parentcustomerid_lookupmodal").find(".entity-lookup").find(".entity-grid").eq(0);
    list.on("loaded", function () {

        // hide "Admin Only" column
        list.find("table thead th").eq(2).hide();
        list.find("table tbody tr").each(function () { $(this).find("td").eq(2).hide(); });

        var isAdmin = "{{ user | has_role: 'Administrators' }}";
        console.log("is admin: " + isAdmin);
        if (isAdmin == "false") {
            list.find("table tbody > tr").each(function () {
                var tr = $(this);
                var adminOnly = $(tr).find('td[data-attribute="cr42c_adminonly"]').attr("data-value");
                if (adminOnly == "true") {
                    tr.remove();
                }
            });
        }
    });
});
If I open the lookup again via Portals, these are the options that I am presented with:
Let’s explore the JavaScript code:
I am finding the modal associated with the id parentcustomerid_lookupmodal and injecting a function to the OnLoad event;
Optionally, I am hiding the Admin Only column, as I want that column to be for technical purposes only;
Using Liquid, I am checking if the user contains the Administrators role;
Finally I am looping through the list and checking the value for my Admin Only column, and completely removing the <tr> element in case it’s not supposed to be shown.
Here are a few other business scenarios for which this approach might be applicable:
Dynamic filter based on a parent record (performing a query via oData or FetchXML to retrieve the related records);
Filter records on an Associate modal – for this we just need to change how to assign the list variable:
From:
var list = $("#parentcustomerid_lookupmodal").find(".entity-lookup").find(".entity-grid").eq(0);
To:
var list = $(".associate-lookup").find(".entity-grid").eq(0);
Conclusion
I really wish we were able to select which view to display in Portal lookups, as well as set them dynamically. Perhaps Microsoft will add this feature in the future, but in the meantime this JavaScript code is a good solution for filtering lookup controls.
I hope this tip comes in handy for your Power Apps Portals project.
A very common business requirement I see is to create a record as well as related (1:N) records within the same page. By design, in Power Apps Portals (as well as Dynamics 365 / CDS / Dataverse) we need first to create the main/parent record to be able to create any related records. There are a few different ways to implement this, for example:
Web Forms (or Entity Forms with redirect) – having the initial step to the main record creation, and then moving to another step/page with the subgrid
Web API – the new Web API allows us to create multiple records in the same request, but requires a good bit of custom development
The above might be enough for most scenarios, but I want to explore here a different one that is very common. Let’s say we have an Entity List (or subgrid) with both Create and Edit actions enabled using an Entity Form modal instead of opening a Web Page – how can we fix this problem then?
We can achieve this requirement by adding a JavaScript on the Entity List (or Entity Form containing the subgrid if that’s your case). The idea of the JavaScript code is to check if there is any created record on every time the list is loaded, and force the Edit Entity Form to open, this will allow the user to enter the related records without having to click on the record. Let’s take a look at how this will look to the end-user:
Technical Implementation
I will explain here, at a high-level, my implementation:
I have two global variables to help in my code
existingRecordList – this is an array that I will store the existing list items whenever loaded
firstLoad – this is a simple variable to control when the page is being loaded for the first time
Then I inject a function (CheckNewRecord) to the onload event of my Entity List
These are the steps of my main function (CheckNewRecord):
Initiate the existingRecordsList in case this is the first load
Compare the size between existingRecordsList and Entity List records
I am creating a new temporary array to avoid conflicting with my global array
For each item of my Entity List:
Add the record ID to the temporary array
Ignore if this is the first time loading or if we already found which one is the new record
Check if the ID doesn’t exist in the global array
If it doesn’t exist, it means we found the new record, so we can store that in a separate variable (newRecordId) as well as marking that we already found the new record
Reload the global array with the temporary array; this is necessary for the next loads of the Entity List
If we found a new record, we need then to open the Edit modal/Entity Form
Via jQuery I am finding the element with the ID of the new record, and triggering the click event for the “details-link” class
Finally set the firstLoad control variable to false
var existingRecordsList;
var firstLoad = true;

$(document).ready(function() {

    var list = $(".entitylist.entity-grid").eq(0);
    list.on("loaded", CheckNewRecord);
});

function CheckNewRecord() {

    var list = $(".entitylist.entity-grid").eq(0);
    var newRecordFound = false;
    var newRecordId;

    // first load
    if (firstLoad) {
        existingRecordsList = [];
    }

    if (existingRecordsList.length != $(list).find('table tbody tr').length) {

        var tempRecordList = [];

        $(list).find('table tbody tr').each(function() {
            var id = $(this).attr("data-id");
            tempRecordList.push(id);

            if (!firstLoad && !newRecordFound && existingRecordsList.indexOf(id) < 0) {
                newRecordId = id;
                newRecordFound = true;
            }
        });
        // reload global variable with items in temp list
        existingRecordsList = tempRecordList;

        if (newRecordFound && !!newRecordId) {
            // open edit modal
            var newRecordElement = $(list).find("[data-id='" + newRecordId + "']");
            $(newRecordElement).find("a.details-link").eq(0).trigger("click");
        }
    }
    firstLoad = false;
}
Conclusion
The idea of this post was more to show tricks that we can do with an Entity List/Subgrid by applying JavaScript code. This is not limited to opening the Edit Entity Form after the creation, but really anything you might need to perform via JavaScript once a record is created and you don’t want to re-load the page.
This works pretty well with an Entity List/Subgrid containing a small number of records. But be mindful that in case of a large list, this might not work as the new record might not be in the current page.
Recently I’ve made a presentation at the Dublin user group on the new Power Apps Portals Web API. In this post I would like to share the slide deck and code used.
I haven’t done any post on the Web API, and the main reason is that I find Microsoft documentation pretty solid on this topic (and I am not a big fan of Microsoft’s documentation for new products).
Currently in Power Apps Portals, we can retrieve CDS data programmatically by using oData or FetchXML, but we have no way to perform insert/update operations against CDS data. The only ways to achieve these operations are through Entity Forms / Web Forms (there are alternative techniques but I won’t go into detail on these).
I have seen several business requirements that would need to perform operations without having an Entity Form associated, let me give you a few examples:
Editable Grid
Bulk delete within an Entity List
Bulk workflow trigger within an Entity List
Mark a Case or Notification record as read
Insert/Update records on a page being rendered via Liquid Template
Basically with the new Power Apps Portals Web API all those requirements will now be possible to achieve. Basically the Web API will open the doors for many possibilities.
The editable grid
During my presentation, I created an editable grid to be used against the Account entity, let’s take a look at how it looks:
I want to share here the code used in my presentation, but note that there might be a few requirements necessary that I won’t be exploring in this post. At a high-level, this is what is required:
Enable Web API via Site Settings (for both Account and Contact entities);
Create Entity Permissions (for both Account and Contact entities);
Create Web Template with Web API wrapper provided by Microsoft;
I have a custom CSS loaded with very simple definitions just to render my custom grid;
I have a “loading” gif just to give a better UX while the operation is happening
Okay, now I can talk about the code responsible for rendering my editable grid, as well as perform the Web API operations:
I am extending the OOB Layout 1 Column, and overriding the block main, this is just for rendering my content;
Now I have a fetch for the Account entity, which I am retrieving the Account Name, Primary Contact and telephone number;
I am adding a button responsible for the “New” account – you can see that I am assigning the NewRecord function to the button (we’ll go through that later);
Now I start rendering the table representing the editable grid itself, and just to simplify things, I am assigning an ID to each individual cell using the format (<account guid><_attribute name>). This will make it easier to retrieve the values later on, but you could achieve this in other ways as well;
For each row, I am adding a “Remove” and “Update” button, assigning a JavaScript function as well
Now we can talk about the JavaScript functions:
NewRecord() – This function creates a new line in the table, assigning a new GUID for the (to be created) Account. Here the remove button calls a different function, that won’t be calling the API, only removing the record from the table, and finally the button for create, which will obviously create the Account in the CDS;
NewGuid() – This function simply generates a new GUID;
CreateRecord(accountId) – This function is responsible for creating the Account and, along with it, it also creates a new Contact record in the same API request call. Finally, it refreshes the page so the remove and update functions are loaded correctly;
UpdateRecord(accountId) – This function updates only the Account Name and Telephone, I am not too bothered with the Contact for the sake of this demo;
RemoveUnsavedRecord(accountId) – This just removes a row without going through the API;
RemoveRecord(accountId) – This function calls the DELETE API method and removes the row from the table
The Web API is currently in preview, and the general message is that it shouldn’t be used in Production environments. In my personal opinion, this feature is in good shape and shouldn’t have major changes until it reaches General Availability. I also doubt that Microsoft would cancel the rollout for this.
In other words, I would use it in Production, just keep in mind that you may have to re-factor some code in case of any changes from Microsoft.