Power Pages gives us the ability of adding a search option to Lists out of the box, which is a great functionality if you consider the effort if we had to implement this manually.
By default, the search looks for the exact match on all columns available in the List, and if you need to use a LIKE operator, you need to add a wildcard (*) to the search term.
If you are coming from a Dynamics 365 background, you are probably very familiar with this behaviour, but when thinking of external users, this might not be the case, and the experience may not be natural to users.
In this quick article I want to share a JavaScript code that will automatically inject an * to the search term whenever the user performs a search. Initially when trying this out I thought it would be a lot easier than it actually was, so here I will explain all the functions and the logic behind the code:
AddSearchWildcard: This function will get the text input element for the search, and add a * in the start of the search term
ClearWildcardSearch: This function will remove the * from the text input so it all looks transparent to the user
ClearSearchTooltip: By default, we have a tooltip explaining to the user to add a *, however this is not necessary, so this function complete removes the tooltip.
BindFirst: This function is used to enforce that our AddSearchWildcard function will be executed prior to the search itself
document.ready: Finally on document ready the we are registering the BindFirst Function and adding the necessary functions to the appropriate event listeners.
And the full code is:
$(document).ready(function () {
    $.fn.bindFirst = BindFirst;
    var list = $(".entitylist.entity-grid").eq(0);
    list.on("loaded", function () {

        var searchButton = $('.entitylist-search > div.input-group-btn > button');
        searchButton.bindFirst("click", AddSearchWildcard);
        searchButton.on("click", ClearWildcardSearch);
        ClearSearchTooltip();
    });
});

function AddSearchWildcard() {
    var queryInput = $("input.query");
    var queryInputValue = queryInput.val();
    if (!!queryInputValue && !queryInputValue.startsWith("*")) {
        $(queryInput).val("*" + queryInputValue);
    }
};

function ClearWildcardSearch() {
    var queryInput = $("input.query");
    var queryInputValue = queryInput.val();

    if (!!queryInputValue && queryInputValue.startsWith("*")) {
        queryInput.val(queryInputValue.substring(1, queryInputValue.length));
    }
}

function ClearSearchTooltip() {
    var queryInput = $("input.query");
    queryInput.attr("aria-label", "");
    queryInput.attr("data-original-title", "");
};

function BindFirst(eventName, eventHandler) {
    var elem, handlers, i, _len;
    this.bind(eventName, eventHandler);
    for (i = 0, _len = this.length; i < _len; i++) {
        elem = this[i];
        if (!!elem.tagName && elem.tagName == "BUTTON") {
            handlers = $._data(elem).events[eventName.split('.')[0]];
            handlers.unshift(handlers.pop());
        }
    }
}
Conclusion
This solution is great to enhance the user experience when searching within Lists, however keep in mind that this performs a server-side search on every column available in the list, so if you have too many columns and records on your list this might decrease your Portal performance. Before publishing this make sure that your list is already optimized with only necessary columns.
Following up on a comment from another post: Custom Lookup filter, I feel like this deserves its own dedicated article.
A Lookup column in a Basic Form/Advanced Form in Power Apps Portals is represented in a Web Page by a web control that contains a modal associated to it. This modal gives us the ability to select and filter records for that entity.
If your Lookup column is empty, when clicking on the magnifying glass, the Portals will automatically select the first record:
This behaviour might not be what you are looking for, so in this article I wanted to share a simple JavaScript code that will untick the default value, unless the lookup column already contains data:
$(document).ready(function () {

    var modalList = $("#cr285_customerlookup_lookupmodal").find(".entity-lookup").find(".entity-grid").eq(0);
    modalList.on("loaded", function () {
        var lookupValue = $("#cr285_customerlookup").val();
        if (!!!lookupValue) {
            var selected = modalList.find("table tbody > tr.selected");
            $(selected).find("td[data-th=Select] > span[role='checkbox']").click()
        }

    });
});
Also worth mentioning that this is not removing the record/row from the table within the modal. It is simply deselecting the record.
I hope this helps with your Power Apps Portals implementation.
Update December 2022
I just heard from Microsoft that this has now been fixed and shouldn’t be an issue. This articles is still relevant for injecting code to the lookup window, so I will keep the article here.
When creating a page containing an Entity List (or just List) in Power Apps Portals, it is very common to add a details page so users can drill-down to the records details.
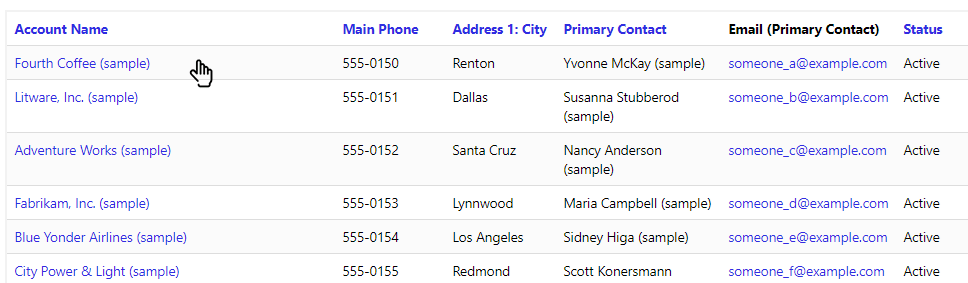
The list is represented as below example:
By default, the first column contains the link to the details Web Page as well as the action menu on the right dropdown.
In this post, I will share two options for JavaScript/jQuery code to make the entire row clickable.
Solution 1 – Making each cell clickable
In this example, we will perform the following:
Loop through the list, retrieving the URL for record details each row
Then we will loop through each individual cell, and attach an <a> element to represent the link
The code also needs to ignore the TD containing the dropdown (optionally this can be removed)
SetLinkAllCells = function () {

    var entityList = $(".entitylist.entity-grid").eq(0);

    entityList.on("loaded", function () {
        entityList.find("table tbody > tr").each(function (index, tr) {

            var primaryColumn = $(tr).find('td')[0];

            /// or retrieve column by name
            /// var primaryColumn = tr.find('td[data-attribute="name"]');

            var url = $(primaryColumn).find("a")[0].href;
            console.log("URL: " + url);
            if (!!url) {
                $(tr).find('td').each(function (index, td) {
                    /// ignore action menu / dropdown
                    if ($(td).attr("aria-label") == "action menu")
                        return;

                    var cellValue = $(td).text();
                    /// clear td value
                    $(td).text("");
                    var newElement = '<a href="' + url + '" class="details-link has-tooltip" data-toggle="tooltip">' + cellValue + '</a>';
                    $(td).append(newElement);
                });
            }
        });
    });
};
Solution 2 – Making the table row clickable
In this example, we will perform the following:
Loop through the list, retrieving the URL for record details each row
Attach a new function to the click event of the row, redirecting the user to the URL
Remove the action menu, as this will also be triggered on the row click event
Set the cursor to pointer for better UX
SetLinkAllRow = function(){
    var entityList = $(".entitylist.entity-grid").eq(0);

    entityList.on("loaded", function () {
        entityList.find("table tbody > tr").each(function (index, tr) {

            var primaryColumn = $(tr).find('td')[0];

            /// or retrieve column by name
            /// var primaryColumn = tr.find('td[data-attribute="name"]');

            var url = $(primaryColumn).find("a")[0].href;
            console.log("URL: " + url);
            if (!!url) {
                $(tr).css("cursor","pointer")
                // remove menu dropdown
                $(tr).find('td[aria-label="action menu"]').remove();

                $(tr).click(function(){
                    window.location.href = url;
                });
            }
        });
    });
};
Now all we need is to use the preferred method:
$(document).ready(function () {
    //SetLinkAllRow();
    // or
    //SetLinkAllCells();
});
Conclusion
Each method might suit different needs, you might also consider ignoring cells that already contain a clickable value, for example e-mail address or phone number columns.
Also if your action menu contains several actions, such as delete / start a workflow, etc, the solution might need a bit of a tweak.
In general, this can be a quick win to improve UX in your Power Apps Portals implementation.
Entity Lists are a powerful feature from Power Apps Portals to quickly expose data from Dataverse. But loading a large set of data can lead to a terrible user experience if the page keeps loading for a long period of time.
In this article, I will show a trick on how to basically not load the data until the user has applied a filter to the list.
Data and Entity List setup
For this example, I have the following setup:
Account table with over 1000 records;
Web Page showing an Entity List;
Entity List pointing to the Account table, Page Size = 500 and Metadata Filter enabled on the Account name.
When opening my page, this is taking and average of 9 seconds to render, which can be quite a lot and depending on the internet connection this could be even worse.
Entity List – Metadata Filter
Now it’s time for a hidden trick with regards Metadata Filtering. We can actually pre-inject values to the URL and this will be applied before loading the list itself. The format must be the following:
?mf=0=firstvalue%261=secvalue%262=thirdvalue…
Let’s breakdown and understand the meaning of that:
? this just separates the main URL from its parameters, basic web stuff here;
mf= means the Metadata Filter, and whatever follows is the value of the mf parameter;
0 means the index of the filter;
=firstvalue assigns the first filter value to “firstvalue”;
optionally if you have multiple filter attributes:
%26 this is the ASCII code for the char &, so basically it is appending multiple parameters;
1 means the index of the second filter;
=secvalue assigns the second filter value to “secvalue”;
and you can keep going if you want…..
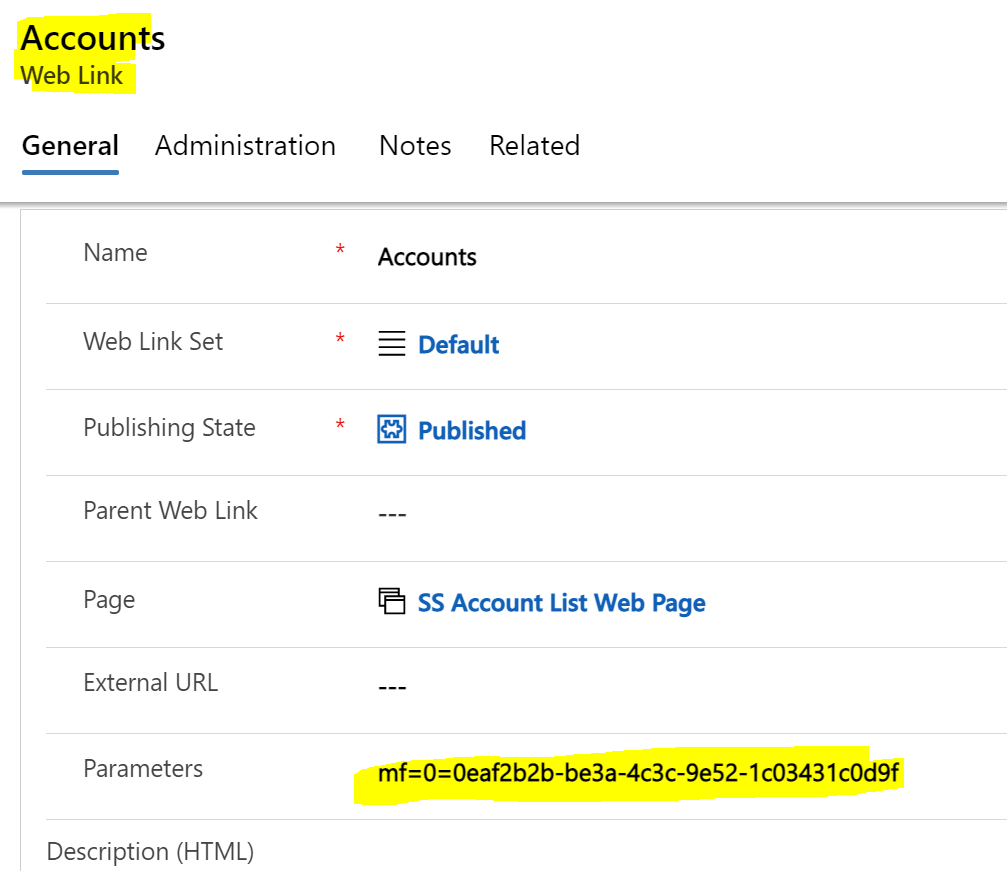
In my example, I only have only filter, so let’s see what happens when I try to load the page by adding the parameter in the url:
Power Apps Portals is reading my URL and automatically assigning a value to the first filter, all this happens at the server-side level and the page is loaded super quick (less than a second).
I decided to generate a GUID value as I would never have an account with that name, but you could use anything you want here.
Clear the value in Metadata Filter
We are almost there, final step is to clear the value that is present in the Filter on the load of the page, this can be achieved by the following JavaScript/jQuery code:
  $(document).ready(function(){
    ClearFilter();
  });

  function ClearFilter(){
    var params = new URLSearchParams(window.location.search);
    var mf = params.get("mf"); // metadata filters
    if(mf === "0=0eaf2b2b-be3a-4c3c-9e52-1c03431c0d9f"){
      $("#0").val("");
      var listAccounts = $(".entitylist.entity-grid").eq(0);
      listAccounts.on("loaded", function () {
        listAccounts.find(".view-empty.message").text("Please enter a filter criteria to find an Account record!")
      });
    }
  };
Let’s explore what the code is doing:
Retrieve the URL Parameters;
Retrieve the mf parameter;
Check the value for my 0 indexed filter. This is the same value as entered previously in my Web Link – note that you could use anything here, as long as they match;
If it’s a match, clear the value for the element with id 0 – by default, metadata filters are rendered being assigned the id the same as the filter index;
Via Entity List, we can setup the message for empty list, but not for “record not found”. This would be possible to change via Content Snippet, but that would be applied to every Entity List in the Portals. For this reason I am changing the message in my list via JavaScript to indicate that the user should enter a filter criteria.
Conclusion
Loading a large set of data is a very common scenario and with very little code we can enhance the user experience by forcing them to use the filter.
Have you every solved this using a different approach? Please post on the comments the strategy you took.
A very common business requirement I see is to create a record as well as related (1:N) records within the same page. By design, in Power Apps Portals (as well as Dynamics 365 / CDS / Dataverse) we need first to create the main/parent record to be able to create any related records. There are a few different ways to implement this, for example:
Web Forms (or Entity Forms with redirect) – having the initial step to the main record creation, and then moving to another step/page with the subgrid
Web API – the new Web API allows us to create multiple records in the same request, but requires a good bit of custom development
The above might be enough for most scenarios, but I want to explore here a different one that is very common. Let’s say we have an Entity List (or subgrid) with both Create and Edit actions enabled using an Entity Form modal instead of opening a Web Page – how can we fix this problem then?
We can achieve this requirement by adding a JavaScript on the Entity List (or Entity Form containing the subgrid if that’s your case). The idea of the JavaScript code is to check if there is any created record on every time the list is loaded, and force the Edit Entity Form to open, this will allow the user to enter the related records without having to click on the record. Let’s take a look at how this will look to the end-user:
Technical Implementation
I will explain here, at a high-level, my implementation:
I have two global variables to help in my code
existingRecordList – this is an array that I will store the existing list items whenever loaded
firstLoad – this is a simple variable to control when the page is being loaded for the first time
Then I inject a function (CheckNewRecord) to the onload event of my Entity List
These are the steps of my main function (CheckNewRecord):
Initiate the existingRecordsList in case this is the first load
Compare the size between existingRecordsList and Entity List records
I am creating a new temporary array to avoid conflicting with my global array
For each item of my Entity List:
Add the record ID to the temporary array
Ignore if this is the first time loading or if we already found which one is the new record
Check if the ID doesn’t exist in the global array
If it doesn’t exist, it means we found the new record, so we can store that in a separate variable (newRecordId) as well as marking that we already found the new record
Reload the global array with the temporary array; this is necessary for the next loads of the Entity List
If we found a new record, we need then to open the Edit modal/Entity Form
Via jQuery I am finding the element with the ID of the new record, and triggering the click event for the “details-link” class
Finally set the firstLoad control variable to false
var existingRecordsList;
var firstLoad = true;

$(document).ready(function() {

    var list = $(".entitylist.entity-grid").eq(0);
    list.on("loaded", CheckNewRecord);
});

function CheckNewRecord() {

    var list = $(".entitylist.entity-grid").eq(0);
    var newRecordFound = false;
    var newRecordId;

    // first load
    if (firstLoad) {
        existingRecordsList = [];
    }

    if (existingRecordsList.length != $(list).find('table tbody tr').length) {

        var tempRecordList = [];

        $(list).find('table tbody tr').each(function() {
            var id = $(this).attr("data-id");
            tempRecordList.push(id);

            if (!firstLoad && !newRecordFound && existingRecordsList.indexOf(id) < 0) {
                newRecordId = id;
                newRecordFound = true;
            }
        });
        // reload global variable with items in temp list
        existingRecordsList = tempRecordList;

        if (newRecordFound && !!newRecordId) {
            // open edit modal
            var newRecordElement = $(list).find("[data-id='" + newRecordId + "']");
            $(newRecordElement).find("a.details-link").eq(0).trigger("click");
        }
    }
    firstLoad = false;
}
Conclusion
The idea of this post was more to show tricks that we can do with an Entity List/Subgrid by applying JavaScript code. This is not limited to opening the Edit Entity Form after the creation, but really anything you might need to perform via JavaScript once a record is created and you don’t want to re-load the page.
This works pretty well with an Entity List/Subgrid containing a small number of records. But be mindful that in case of a large list, this might not work as the new record might not be in the current page.
I recently came across an interesting requirement that I thought would be worth sharing here. Yet again I will be working with Entity Lists, and some implementations will be used from previous posts.
Business Requirement:
Display list of records in the Portal
Allow users to download a document with record details (including child entities)
Document should be (preferably) Word format
The document should also be available in D365
Before we dive into the details, here is a sneak peek of what will be achieved by the end of this post:
To achieve this, I will use the following components:
Web File with the Word icon
Web Page and Entity List for the Contact entity
Entity List actions
View record details
Run Workflow (to generate the Word Document)
Entity Permissions
Custom entity (Application) with the following relationship:
Contact 1:N Application
Word Template against the Contact record, displaying contact details and a list of Applications
Workflow to set generate Word Template against the Contact record
CSS customizations to display my workflow actions as icons
JavaScript code to dynamically create the download button
Implementation
My overall approach for this will be using as much as possible existing D365 features, I won’t write any custom code in D365, only client-side code in the Portals will be necessary.
Web File:
As I want my Entity List to display a Word Icon, I am creating a Web File and uploading the icon from IconFinder.com
I want to use a Word icon for my “Generate Document” workflow action in my entity list, so I am adding one more class to my CSS, this is to set the height and position of my image (you wouldn’t need this if you were using icons within the bootstrap/glyphicon):
The Word document will be generated as a Note attached to my Contact record in D365, for this reason we need to have an entity permission for the Note entity, this is a child entity permission against my Contact entity permission, for more details on parent/child entity permissions please refer to the following documentation: https://docs.microsoft.com/en-us/powerapps/maker/portals/configure/assign-entity-permissions
D365 Application Entity/ Contact Entity
I have a custom entity called Application, with some very simple fields for this demo such as ID, Status, Type and Created On.
Another customization I am making is adding a custom field (Text/URL) in my OOB Contact entity to store the URL of my document, I am calling this “Generated Document URL”.
Finally make sure this URL field is available in your view being displayed on the Portal, in my case the Active Contacts view. Don’t worry, we will hide the column via JavaScript, but this will be important on a later stage.
Word Template
I am using the OOB Word Template feature to generate my document. What I like about this is that we can generate the document manually via D365 or through a workflow, which is perfect for my scenario. For more details on how to create the Word Template please refer to the following: https://docs.microsoft.com/en-us/power-platform/admin/using-word-templates-dynamics-365.
My template will display a logo image, the Contact name and e-mail and a list of the existing Applications.
Workflows
We need two sync workflows to achieve our need. Here I will describe each of the workflow steps:
Generate Word Document
Sync Workflow
Trigger: On-Demand
Entity: Contact
Scope: Organization
Steps:
 - Perform Action: SetWordTemplate (pass the contact record and set the Word Template created as actions parameters)
The SetWordTemplate is an OOB action that creates a note against the record with the generated Word Document.
A note record in your Portal can be accessed via the following URL pattern: <portalurl>/_entity/annotation/<note guid>, so now we need to generate the URL against the Contact record. For this I am creating the below workflow:
Set Contact Generated Document URL
Sync Workflow
Trigger: Record is created
Entity: Note
Scope: Organization
Steps:
 - Validate if the Regarding field of the note is a Contact
 - Validate if the File Name is <your word template name> (you can make better validations, I am going for simple ones for this demo)
 - Now we need the note GUID, to avoid code I am using the D365 Workflow Tools solution: https://github.com/demianrasko/Dynamics-365-Workflow-Tools/blob/master/docs/GetRecordID.md but you could also write your own custom code to retrieve the record GUID
 - The next step is to update the related Contact record with the URL pattern + Note GUID. All we need here is the relative path, no need for the Portal root URL (as this might change between environments or other reasons)
Entity List JavaScript:
At this point we have the core of our development done. If you navigate to your Web Page you should have the Word icon to generate your document, and once triggered, the URL column from your view, once empty, should get populated with the document URL, if you click that URL you should be able to download your document.
Now we need to add a JavaScript logic, attached to the Entity List Load event, that will perform the following actions:
Hide URL column
For each row:
Get the URL from the “Generated Document URL” attribute
If this contains data, create dynamically an element in the same structure as the other elements
Append new element to the workflow links so it will be the last action
The following JavaScript code can be placed in the Entity List custom JavaScript section:
Now after refreshing the cache and your Web Page you should see the below behavior:
Caching Issues?
We all know the Portals have some caching issues, but this shouldn’t be an issue with the above implementation. For any actions triggered by the Portals, the cache is automatically refreshed for that record, as in our scenario we are using sync workflows, the cache gets refreshed within the same transaction.
Conclusion
My example was specific to generate a Word document using a Word Template in D365, but this approach could be used for several other requirements where you have a workflow updating the main record in real-time, and appending a dynamic link to anything on your entity list.
Have you ever had a similar requirement? Please comment below with how you implemented it.
If you find this post useful feel free to like and share it.
But if we have too many Actions setup in our Entity List, the page gets very busy, so it may not be ideal. In this post I am going to show another way to achieve a similar result using JavaScript/jQuery, but this time we will leave the main actions (Details/Edit/Delete) as icons, and the remaining in the dropdown.
So I am going to remove the CSS from my Web Page, and my Entity List is going back to this state:
If you didn’t see my previous post, what I have here is a simple Entity List pointing to my Active Accounts view from my CDS environment, and I have a few actions setup as part of my Entity List (Edit/View Details/Delete/Run Workflow to send an e-mail).
Now it’s time to write the JavaScript, there are tons of ways to approach this, I will describe the actions I am performing in my JavaScript:
Validate that my list contains actions associated
Create an object with the rows from the list
Start looping the list rows
Create an object with the actions for that row (only actions for Edit/Details/Delete)
Start looping the actions
Create an object to store the span class of the action, which contains the icon
Create dynamically a new <span> with the previous class and add that to the main action element
Via JS I am adding some styling, but you can also set a class from your CSS and reference it here, you can also change those properties if you prefer the icons bigger/smaller
Remove the old action element
Create an object with the actions for that row (Workflow)
Start looping the actions
Here I will replace the current <div> element for a new <a> element
Again I am manually applying some styling that could be in the CSS
Move the <a> element to the far right by appending to the previous object
Finally we can remove the old dropdown button completely
$(document).ready(function () {
    ChangeGridButtons();
});
ChangeGridButtons = function () {
    $(“.entity-grid”).on(“loaded”, function () {
        if ($(this).find(“.view-grid .table tbody tr td:last-child ul.dropdown-menu > li > a.details-link, .view-grid .table tbody tr td:last-child ul.dropdown-menu > li > a.edit-link, .view-grid .table tbody tr td:last-child ul.dropdown-menu > li > a.deactivate-link, .view-grid .table tbody tr td:last-child ul.dropdown-menu > li > a.delete-link, .view-grid .table tbody tr td:last-child ul.dropdown-menu > li > a.disassociate-link”).length > 0) {
            var rows = $(this).find(“.view-grid .table tbody tr td:last-child”);
            $.each(rows, function (index, row) {
                var actions = $(row).find(“ul.dropdown-menu > li > a.details-link, ul.dropdown-menu > li > a.edit-link, ul.dropdown-menu > li > a.deactivate-link, ul.dropdown-menu > li > a.delete-link, ul.dropdown-menu > li > a.disassociate-link”);
                $.each(actions, function (index, action) {
                    var li = $(action).parent();
                    var iconClass = $(action).find(“span”).attr(“class”);
                    $(action).append(“<span class='” + iconClass + “‘></span>”);
                    $(action).append($(action).find(“span”));
                    $(action).css(“font-size”, “18px”);
                    $(action).css(“text-decoration”, “none”);
                    $(action).css(“padding-right”, “4px”);
                    $(row).append($(action));
                    li.remove();
                });
                var actions = $(row).find(“ul.dropdown-menu > li > a.workflow-link”);
                if (actions.length > 0) {
                    var divDropDown = $(row).find(“div.dropdown”);
                    $(divDropDown).css(“display”, “unset”);
                    $(divDropDown).append(“<a class=’dropdown-link’></a>”);
                    var aDropDown = $(divDropDown).find(“a.dropdown-link”);
                    $(aDropDown).attr(“aria-expanded”, “false”);
                    $(aDropDown).attr(“data-toggle”, “dropdown”);
                    $(aDropDown).css(“text-decoration”, “none”);
                    $(aDropDown).css(“cursor”, “pointer”);
                    $(aDropDown).append($(divDropDown).find(“span”));
                    // move dropdown to the far right
                    $(divDropDown).appendTo(row);
                }
                $(row).find(“div.dropdown”).find(“button”).remove();
            });
        }
    });
};
You can place the above code in the Entity List or Web Page custom JavaScript section, and now this is how our Entity List looks:
JavaScript VS CSS – Which one is better?
Well, there is no right or wrong, it really depends on your scenario/requirement.
Performance wise we can expect the CSS method would be better, but usually you won’t have an Entity List displaying a large number of records per page, by default an Entity List displays 10 records per page, so the JavaScript should run quick enough. It also depends on what you are most comfortable with, performing style changes or code changes.
I hope you find this post useful for your Portals project.
These Actions are displayed in a dropdown list on the right side of each record:
For a nicer UX, I will show you how to display the actions as icons within the list row.
There are a few different ways to achieve this, I will write two posts, one using CSS, and another one using JavaScript.
To start, I am creating an Entity List pointing to the Active Contacts view in my CDS environment.
Now I am creating the following actions against my Entity List and the necessary components involved:
Edit Action – Entity Form to edit the record
View Details Action – Web Page to view record details
Delete Action – Deletes the record and refreshes list
Workflow Action – Simple Workflow to send an notification e-mail to the Contact (this will only be visible if the Contact record has an e-mail, you can view more details on this in the following post: Power Apps Portals – Entity List: Conditional Action)
CSS
I am creating a CSS now that will perform the following actions:
Hide the dropdown button
Force the action menu to be displayed (without the dropdown button)
Force the menu items to be displayed inline (the same row)
Set the font-size as 0 so it will hide the text
Set the font-size only for the <span> element (which contains the icon) to 18px (you can always change this size if you want it bigger/smaller icons)
Set a different color for the hover event of the icon
For simplicity I am adding the CSS in the Web Page CSS section, but you could also apply this to the existing bootstrap web file, or create your own CSS web file.
Now by refreshing your page (remember always to clear the cache), you will have the following result:
Ok, great we have the icons there, but where has my Workflow action gone?
By default, Workflow actions (and a few others) doesn’t have an icon related to the action, for this reason our CSS is not working properly. If I inspect the element, I can actually see the action is there, but as it doesn’t have any icon, we are hiding the text and there is nothing to be rendered:
How do we fix it?
Simple enough, we need to add an icon to our action, we can do this in the Entity List options, by adding a <span> element to the button label property:
I am adding an envelope icon as my workflow represents sending an e-mail, but you can have a generic icon or anything else within the bootstrap/glyphicons: https://getbootstrap.com/docs/3.3/components/.
This is how my Entity List looks now:
Conclusion
I think this really enhances the user experience within an Entity List/Subgrid in the Portal, and the CSS method is a very simple implementation.
If your list contains too many actions, you might end up with a very busy web page and a poor UX. For this I will write a separate post using JavaScript, keeping the main actions as icons, and having secondary actions in the dropdown.
A special thanks to my colleague Jonathan Pavan that helped on this.
Hi, today I am going to talk about how to remove the Sort / Order By for a column within an Entity List in Power Apps Portals.
There are a few different ways on achieving that, I am going to show you a way using JavaScript/jQuery to change the element type representing the column header.
I am creating a simple Entity list pointing to the Active Contact view from my CDS environment, at this point all columns are sortable:
Now I am going to write a JavaScript code, where I am getting the column for the “Full Name” attribute (index 0) and replacing the <a> element for a <span> element.
I am adding this logic to the load event of the Entity List, to make sure it will apply if the user performs a sorting in the other columns, I am also validating the header name (aria-label) before performing the action, the reason for this is because once another load happens (a sort in the other columns for example), the index 0 for my list is now the Email column, which I don’t want to disable sorting in my scenario.
Code to be added in the JavaScript section against the Entity List record:
$(document).ready(function() {
    DisableSort();
});
DisableSort = function() {
    var list = $(“.entitylist.entity - grid”).eq(0);
    list.on(“loaded”, function() {
        var columnIndex = 0; // index of column you want to remove sorting
        var columnName = “Full Name”; // name of column you want to remove sorting
        var column = list.find(“table thead th a”).eq(columnIndex);
        if (column) {
            var text = column.attr(“aria - label”).trim();
            if (text == columnName) {
                column.find(“span”).remove();
                var newElement = “ < span > ”+columnName + “ < /span>”;
                column.replaceWith(newElement);
            }
        }
    });
};
Now the column Full Name for my Entity List is disabled for Sort/Order By:
You could find better ways to retrieve the column index, this is just a simpler code to achieve a common requirement in Power Apps Portals.
In this post, I will show how to filter (display/hide) the Entity List Action options based on the record data with a Fetch XML filter:
Create an Entity List record – I am creating a simple entity list pointing to the Active Contacts view
Create an Action to your Entity List
I am creating a simple Workflow (On-Demand) to send an e-mail to the contact
Create a Web Page record to show the record Details
This will be a Details action
At this moment, if you test your Portal, you will see the two options available in the Action menu for each Item:
Now I want to make a validation against the record to filter my actions, in my case, as an example I will make the following validation:
If the Contact’s email field is empty
Hide the “Send e-mail” option
In the Entity List record, go to the Actions under Grid Configurations, select Advanced Settings and add a Fetch XML in the Filter Criteria (the Fetch XML must contain the header/basic structure, not just the filter):