A couple of weeks ago we had the first 365 Saturday dedicated only to Power Apps Portals. I would just like say a big thanks to everyone that joined and all organizers and speakers for making it happen.
I presented a session on Authentication for Power Apps Portals and just wanted to share the slide deck (even though it was very simple, the main focus was the demo).
Hello and welcome to another JavaScript tip for Power Apps Portals.
In this post I will show you how to set attributes read-only in your Entity Form / Web Form.
A generic way to set an attribute as read-only would be the following:
$("#<attribute name>").attr("readonly", true);
But depending on the datatype of your attribute, some additional changes to the HTML elements might be required. For example, a lookup field is normally rendered with a search button, or a datetime field has the datetime picker next to the input control:
Instead of re-writing the same code every time, let’s create some generic functions passing the field name as parameter, as well as a true/false flag to define if the field should be read-only. We will create a few different functions, according to the field datatype:
We still need one more function to cater for any other datatype. This will be the main function that we will make the call and we need one additional parameter, representing the field datatype.
This function will validate the field type and call the appropriate function we created above (via switch case), finally having the generic read-only function in the default instruction:
Set Field ReadOnly Function
SetFieldReadOnly = function (fieldName, readOnly, type) {
    try {
        type = type.toLowerCase();

        switch (type) {
            case "date":
            case "time":
            case "datetime":
                SetDateTimeFieldReadOnly(fieldName, readOnly);
                break;
            case "lookup":
                SetLookupFieldReadOnly(fieldName, readOnly);
                break;
            case "checkbox":
                SetCheckboxFieldReadOnly(fieldName, readOnly);
                break;
            case "radio":
                SetRadioFieldReadOnly(fieldName, readOnly);
                break;
            case "dropdown":
                SetDropdownFieldReadOnly(fieldName, readOnly);
                break;
            default:
                if (!!readOnly) {
                    $("#" + fieldName).attr("readonly", true);
                    $("#" + fieldName).css("cursor", "not-allowed");
                    $("#" + fieldName).on("mousedown", function (e) { e.preventDefault(); return false; });
                } else {
                    $("#" + fieldName).attr("readonly", false);
                    $("#" + fieldName).css("cursor", "default");
                    $("#" + fieldName).off("mousedown");
                }
                break;
        }
    }
    catch (err) {
        console.error("Error SetFieldReadOnly: " + err.message);
        return;
    }
};
Now you can combine all JavaScript code above, saving as a .js file (and upload as a Web File), or a Web Template record, or a Content Snippet record, etc. Then refer to it in any Portal page, or even the Tracking Code Content Snippet (so it can be used in every page) – and that’s it, the functions are ready to be used in your Portals.
In this post I will show you how to set the field label position within an Entity Form/Web Form in Power Apps Portals.
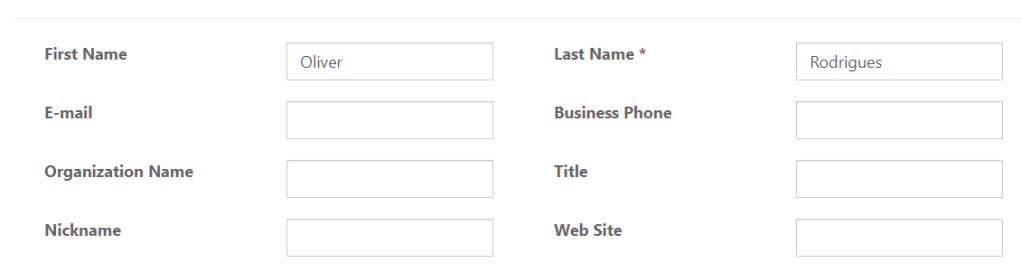
If you are familiar with Dynamics 365, you probably are aware that we can define which position to place a field label within a form. The positions available are:
Side: label and input control are positioned side-by-side
Top: label and input control are positioned as top-bottom
Unfortunately, Power Apps Portals ignores this definition and always renders your form as top-bottom positioning:
I will show you how to change this behavior to render your field label as side-by-side position. We can achieve this via JavaScript or CSS:
Via JavaScript/jQuery
If you need to set only for a specific form or perhaps specific section in your form, you can use the following jQuery function (just relace the sectionGeneral below for your section name):
If you want to setup this behavior for every Entity Form/Web Form within your Portals, or perhaps for an entire Web Page, you can set it via CSS (you can place this in your .css file or the Web Page custom css field):
This is a quick post that might help you in case you come across the below error message when using the Portal Management App within Power Apps Portals:
The first time I had this issue it took me a while to figure out what was happening. When viewing the error details, all I could see is that the Portals couldn’t run its OOB JavaScript (even though I hadn’t made any changes to it):
ReferenceError: Web resource method does not exist: adx.adx_webpage.loadResources
at Kl.execute (https://orgf67a233b.crm4.dynamics.com/uclient/scripts/app.js?v=1.4.1024-2006.4:1262:2548)
at https://orgf67a233b.crm4.dynamics.com/uclient/scripts/app.js?v=1.4.1024-2006.4:118:20532
at o (https://orgf67a233b.crm4.dynamics.com/uclient/scripts/app.js?v=1.4.1024-2006.4:289:133)
at $._executeIndividualEvent (https://orgf67a233b.crm4.dynamics.com/uclient/scripts/app.js?v=1.4.1024-2006.4:118:20508)
at $._executeEventHandler (https://orgf67a233b.crm4.dynamics.com/uclient/scripts/app.js?v=1.4.1024-2006.4:118:18113)
at Object.execute (https://orgf67a233b.crm4.dynamics.com/uclient/scripts/app.js?v=1.4.1024-2006.4:118:15469)
at O._executeSyncAction (https://orgf67a233b.crm4.dynamics.com/uclient/scripts/app.js?v=1.4.1024-2006.4:855:692)
at O._executeSync (https://orgf67a233b.crm4.dynamics.com/uclient/scripts/app.js?v=1.4.1024-2006.4:855:419)
at O.executeAction (https://orgf67a233b.crm4.dynamics.com/uclient/scripts/app.js?v=1.4.1024-2006.4:855:201)
at t.dispatch (https://orgf67a233b.crm4.dynamics.com/uclient/scripts/app.js?v=1.4.1024-2006.4:855:5545)
Fixing this problem is actually a lot easier than it looks. The root cause of this is actually an Ad Block extension that you might have installed in your browser. This issue happened to me with a few different extensions in multiple browsers.
The JavaScript used by the Portal Management App probably uses similar functions as common ads all over the internet, so it ends up blocked, causing several issues when trying to configure Portal data.
To fix this all you need is to either remove the extension, or add an exception based on the website URL. This may vary depending on the extension you have installed, in my case I have the AdBlock for Edge, so I can setup this exception using the option “Don’t run on pages on this site.”
Conclusion
If you have this problem, don’t stress, you didn’t do anything wrong – just follow the steps above and the error message will be gone!
My portal configuration is not showing the latest definition
I can’t see the Clear Cache button
The above are very common questions as regards Power Apps Portals Caching. In this post I will give you guys a few tips on how to identify/solve some of these issues.
A few things are very important to know about how Power Apps Portals uses CDS Dataflex Pro data:
Power Apps Portals shares the same database as your Model-Driven App, it doesn’t have a database copy and there is no data sync involved
A Server-Side Caching is part of the Portals capabilities to improve performance, a message is transferred asynchronously between your Dataflex Pro and the Portals to notify (invalidate) the data once it’s changed
The SLA for message transfer is 15 minutes
Cache is automatically invalidated when sync transactions are triggered via Portals
When a D365 org is reset or restored, cache invalidation can stop working. To enable it, go to Portal Admin Center > Portal details tab > Press Update
Clear Cache function is available on <Portal URL>/_services/about (must be logged in as Administrator)
No web notification invalidation plugin is required to invalidate cache (this was legacy on ADX Portals)
The above should give you a better understanding of how it works. Let me share a few more tips with you:
Clear Cache function in Bookmark
Add the below JavaScript code into a bookmark in your browser, this will open a separate tab with the Clear Cache page, regardless of which Portals/Page you have opened.
The Clear Cache page shows information about your current Power Apps Portals, like version, Organization ID, etc. Three buttons are available for caching actions:
Clear cache: clear cache for both transaction and configuration entities
Rebuild search index: rebuild full search index, to be used when Global Search configurations are changed
Clear config: clear cache for adx_* entities
Administrator Web Role
If you see a blank page when opening the clear cache page, it means you are not logged in as an Administrator user.
Go to https://make.powerapps.com > Apps > Portal Management App > Contact > find your Contact record and under related entities go to Web Roles. Make sure you have the Administrators Web Roles associated to your Contact.
Clear Cache using Portal Studio – Sync Configuration
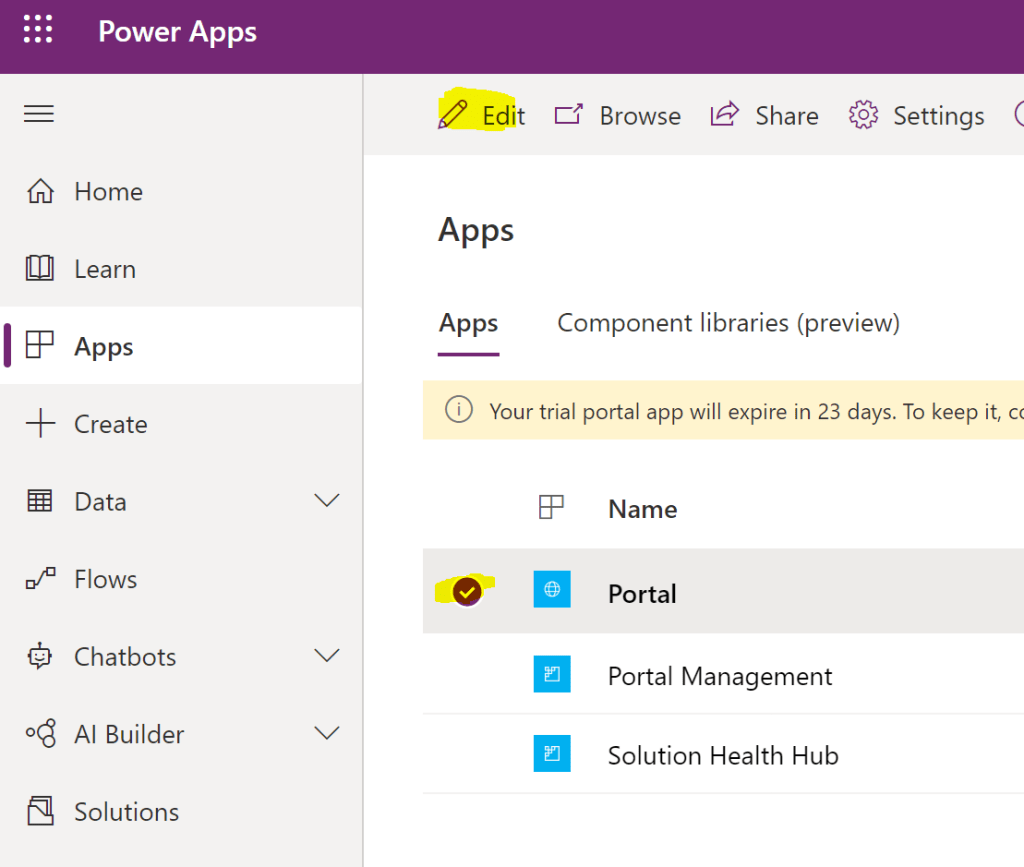
Another way to clear the cache is using Portal Studio capabilities, to use this option, go to https://make.powerapps.com > Apps > Select your Portal app and click Edit:
Click on the Sync Configuration button to clear the cache:
Clear Cache using Portal Admin Center
Also, another way to clear the cache is by using Portal Admin Center actions. To use this option, go to https://make.powerapps.com > Apps > Select your Portal app click Settings and click Administration:
On the left menu click on Portal Actions and click the Restart option:
This will restart the website app service and clear the server-side cache.
This option might take your Portal offline for a few minutes, so be aware of that when performing this action.
Can I Clear Cache Programmatically?
No. Currently there is no supported way to clear cache programmatically, so it is not possible to automate or trigger it programmatically.
Retrieving data via FetchXML/Liquid or oData
If you are retrieving data programmatically in the Portals, it’s possible to bypass the cache by making sure your query is always unique. A simple way of achieving this is by adding a filter with a timestamp, for example:
oData – JavaScript
var oDataURL = "/_odata/myoDataSet";
var filter = "?$filter=new_name ne '" + new Date().getMilliseconds() + "'";
FetchXML – Liquid
In my example, I first create a variable and then add it as a condition in my FetchXML. The only reason I do this is to make it easy to reuse the code in different places, you can even create a Web Template just returning that filter condition and reuse it by using the include tag (maybe this is a topic for another post):
When making changes related to styling/CSS, your local browser cache might be influencing here as well. You might consider trying an in-private/incognito session or clearing the local browser’s cache.
Thanks Nikita Polyakov for this tip.
Conclusion
Microsoft is constantly making improvements related to Portal caching. But for now, we still have to live with some of the above issues.
I hope this post has been useful for you to get a better understanding of how Caching works, and how to overcome potential obstacles you might run into along the way.
Power Apps Portals allows us to add custom JavaScript/jQuery code to manipulate behaviour within the Portals website.
I am starting a series of quick posts with snippets of JavaScript/jQuery code to help you with your Power Apps Portals implementation.
When talking about client-side customization, there is no single way of interacting with the page elements, there are several ways to achieve same results, in this post I will give an example on how to hide & show elements in your page, so here we go:
Have you recently come across a situation where after defining the links for your main navigation menu, it suddenly resets on its own showing every custom Web Page you’ve created? Well, in this post I am going to show you how to stop that from happening.
Behind the scenes
First, we need to understand how the menu is structured. A menu is represented by two entities in your CDS environment:
Web Link Set: represents a group of links, the main menu for example is represented by the Default Web Link Set
Web Link: represents the link to a certain page in your Portal, or an external URL, you can also define an image to be displayed and the order to be shown in your Web Link Set
Finally these entities are represented as custom Liquid objects, being rendered in the Header or Footer Web Template.
What is causing this menu reset?
Now let’s understand exactly what is happening with the Portals.
Microsoft is making a lot of investment in Portals Studio app (https://docs.microsoft.com/en-us/powerapps/maker/portals/portal-designer-anatomy) adding lots of new features on a regular basis. Personally, I am not a big fan of the Portals Studio and I still go to the classic Portal Management app. If you are new to the Portals or just want to quickly update certain content, I completely agree that the Portals Studio interface is much easier and intuitive to make simple changes.
One important (and hidden) feature of the Portals Studio app, is that it automatically refreshes the Default Web Link Set with any custom Web Page you may have created. It doesn’t matter if you’ve created the Web Page via Portal Studio or Portal Management, this seems to happen on the onload event of the Portals Studio, but at the same time it doesn’t show you straight away, only after refreshing the Portals Studio page.
A bit confusing? Let’s try to replicate the issue step-by-step:
Open two tabs in your browser, one with your Portals website and the other the Portal Studio App, at this moment the navigation menu should be identical in both tabs
Create a new Web Page (can be a blank page), sync and refresh first just the Portals website
Now your new Web Page is present in the menu
Now let’s go to the Portal Management App, navigate to the Web Link Set and open the Default Web Link Set. In the Web Links tab, you will see the recently created Web Page there as a new Web Link, even though you didn’t want it to be shown there.
Got it, now what’s the solution?
I know the above text was a bit long, but I think it is important to understand what’s happening in the background. There are a few ways to fix this.
Within the Portals Studio, you can hide the page from showing in the menu, what this will do is deactivate the Web Link record in the CDS, so it won’t show in the menu anymore. Just go to Pages, select the ellipses (…) on your page and click Hide in default menu:
But the problem is still there, if you create new pages it will keep adding to the menu. To get rid of this behavior, we need to change the reference to the Web Link Set. Let’s just forget about the Default Web Link Set and leave the Portals manage it the way it wants, we will be using the Primary Navigation Web Link Set for our menu. In the Portal Management App add/remove any links you want in your menu.
Once the menu has been defined in the Portal Management App, we need to set the Portals to use that Web Link Set, there are two ways of doing this. Please read the entire post before actually making any change in your environment:
Set Navigation Menu via Portals Studio
Open the Portals Studio and click on the main menu, and on the right-hand pane, change the navigation menu dropdown:
Click sync configuration and you’re done!
Set Navigation Menu via Portal Management App / Header Web Template
Go to the Web Templates, open the Header record. Simply change the reference to the Web Link Set, locate the line below, and replace Default for Primary Navigation:
Now clear the cache and don’t worry about this issue again.
Which method should I use?
One thing I noticed is that when changing the navigation menu via Portals Studio, the Portals automatically resets the Header Web Template with the OOB code, changing only the line mentioned above. If you haven’t made any customization in your Web Template, this won’t be an issue, and it is probably easier to change, but if you have made any changes in the Liquid code, you definitely don’t want to lose them, so you’re better off making the change manually in the Web Template.
Apparently this was a bug and it is now fixed in the version 9.2.5.x, although I currently find anywhere in the release notes, when testing this was now updating only the weblinkset assignment, instead of the entire Web Template
Update on 20th July 2020
I see a lot of people having issues with the menu navigation where the pages keep being added, I hope this post clarifies why this is happening and how to solve it.
Hi, in this post I will talk a bit about HTML Meta Tag and how we can setup custom tags in Power Apps Portals <head> element.
For the purpose of this post, I will create a custom Open Graph Meta Tag to be used in Facebook/Twitter.
What are Meta Tags?
The <meta> tag is used to define metadata about the HTML document. This is commonly used by search engines, browser and other web services.
This tag is never displayed on the page and is an empty element, so there is never a closing tag like </meta>.
Open Graph protocol
Open Graph protocol was introduced by Facebook to enable any page becoming a rich object in a social graph – in simpler words, to display your website in a prettier way when sharing via social media. Today several other social medias and web services use this protocol, such as Twitter/Google+ etc.
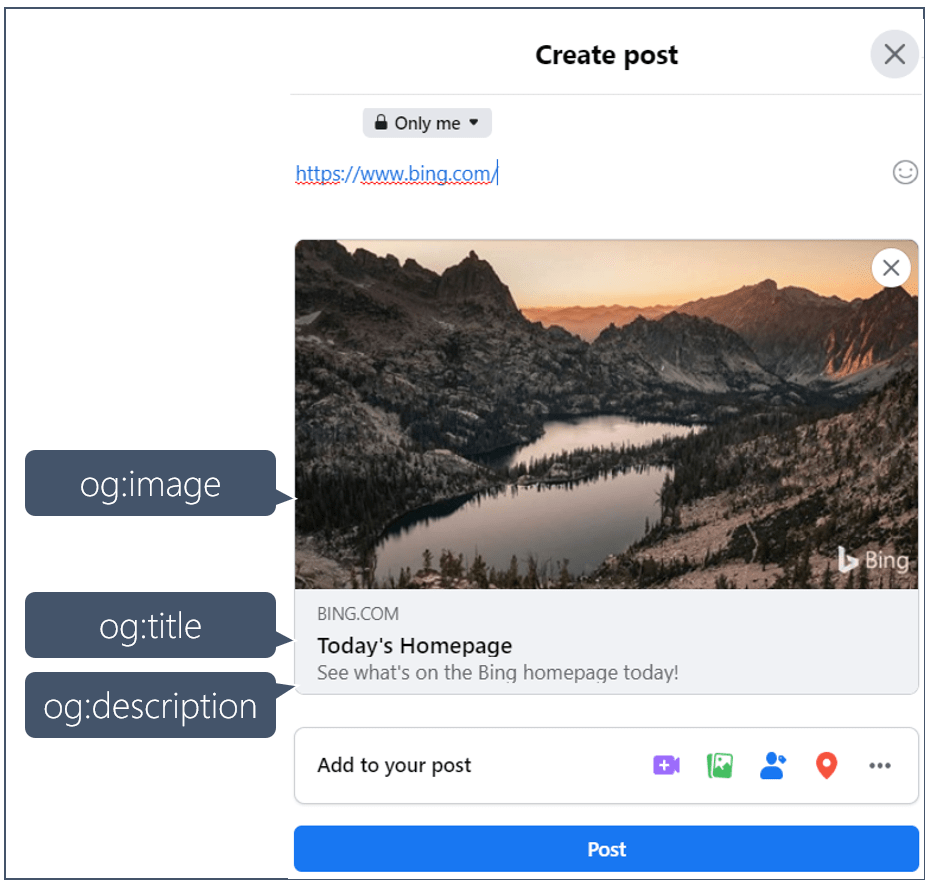
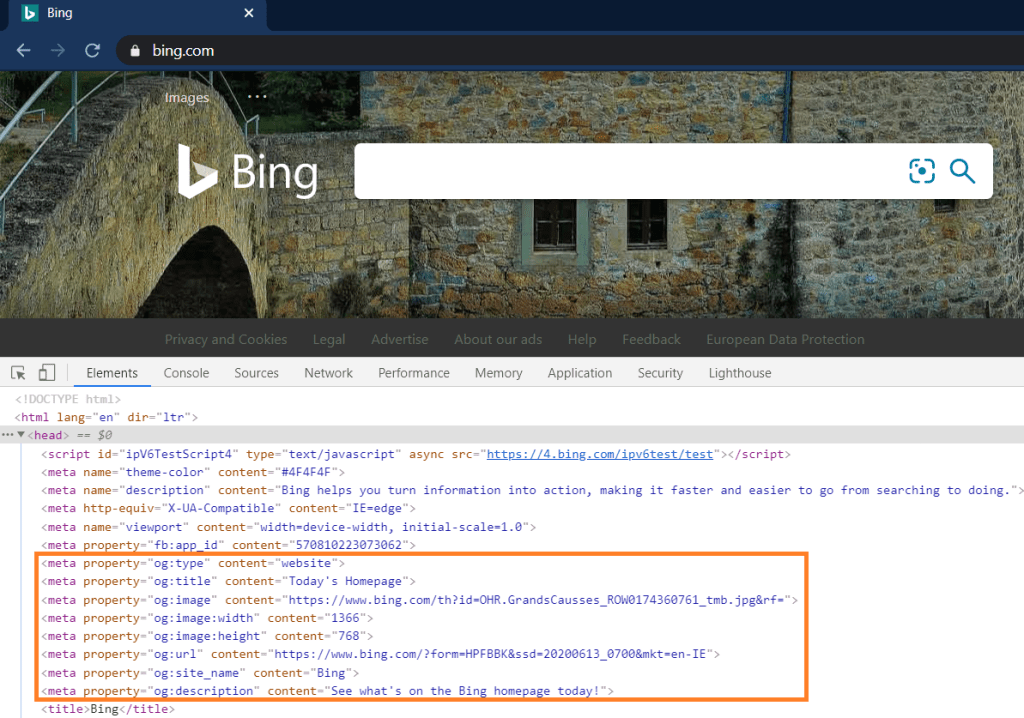
By opening Facebook and add the Bing URL, this is the structure we can see on the post:
If we open bing.com and inspect the page, we can actually see the og meta tags defined on the page:
If we simply try to share an OOB Power Apps Portals via Facebook, this is how it would be presented:
Adding Meta Tag to Power Apps Portals
At first it might look tricky to make this change in Power Apps Portals, but it is actually easier than it looks. Power Apps Portals are full of hidden content snippets, not all are documented. One of them is called Head/Bottom and we can use it exactly to perform changes in the <head> element of the Portals website.
If you can’t find this content snippet in your CDS environment, all you have to do is create the record, set it to HTML type and define the tags in the HTML tab of your snippet.
In my example I am adding an image (created via Web File), description and title:
For my image, I tried initially leaving only the relative path (/og-image.png), but it didn’t work, so I had to change to the full image path (https://<portalurl>/og-image.png).
If we now try to share on Facebook, for example, this is how it looks:
By inspecting the Portals website, we can see the tags at the end of the <head> element:
Caching issues
While testing this, one thing I noticed is that Facebook might cache some data on their side, so you are changing the tags on the Portals, just note that it might take a while to replicate on Facebook.
Conclusion
Meta tags are a simple but effective way to give an insight into what your website is about. Give it a try and see what you think!
In Power Apps Portals, the main navigation menu is represented by the Web Link Set and Web Link objects (entities). A Web Link contains a reference to a Web Page from the Portal or an external URL. The Web Link Set contains a group of Web Links, and can be placed via Liquid template in the Portal.
When setting up Power Apps Portals, by default, it comes with with a few Web Link Sets pre-defined. The Default Web Link Set is used as the primary menu in your Portal. For a better understanding of all the properties of Web Links and Web Link Sets, please refer to the following documentation: https://docs.microsoft.com/en-us/powerapps/maker/portals/configure/manage-web-links.
The way the menu is rendered by default, we cannot have sub-menus or a title to split Web Links. In this post, I will show you a quick tip on how to setup a tree structure for your Portal menu/primary navigation, something like this:
MENU – – – – – – – – – – – – TITLE 01 LINK A LINK B TITLE 02 LINK A LINK B
Implementation
To achieve this, I am going to make customizations in the Web Link entity. There is no problem modifying the OOB Portal entities, just make sure you add any changed objects to an unmanaged solution when moving to other environments, you can’t export the Portals solution as it is a managed solution.
The code that renders the menu is in Liquid Template, and it’s placed in the Header Web Template, we will also make a few changes there.
By default, if you add a custom field to your Portal entities, it will be reflected in the Liquid objects, so you can easily access the value without writing additional code.
If for some reason you prefer not to change the entity, that's fine, another approach would be when creating your Web Link record, add some tag in the name (for example *menu-title*)
Now let’s jump into the customization:
Create a new field in the Web Link entity (I am calling “Display as Title”)
Add the new field to the Web Link form
I am leaving Page / URL blank, additionally if you want you could add a business rule to hide/show those fields according to the Display as Title value
Now open your “Header” Web Template, I am changing the code with the following logic:
If my custom field “ollie_displayastitle” is true, display the link as a title instead of an <a> element
In my example, I am using a <strong> element, but you could use anything here, preferably you should also add a class from your CSS to get a better look & feel
If you didn’t create the custom field and are using the tag like I mentioned *menu-title*, your if condition will be {% if sublink.name contains “*menu-title*” %} and then you also need to remove that using liquid filter {{ sublink.name | remove: “*menu-title* “}}
This snippet of code can be found on the line 62 for the Header Web Template (OOB Portals):
 {% for sublink in sublinks %}
  <li role="none">
    {% if sublink.ollie_displayastitle %}
      <strong>{{ sublink.name | default:sublink.title | escape }}</strong>
      <!-- this can be any element type -->
    {% else %}
      <a
        role="menuitem"
        aria-label="{{ sublink.name | default:sublink.title | escape }}"
        href="{{ sublink.url }}"
        {% if sublink.Open_In_New_Window %}
          target="_blank"
        {% endif %}
        {% if sublink.nofollow %}
          rel="nofollow"
        {% endif %}
        {% if sublink.tooltip %}
          title="{{ sublink.tooltip | escape }}"
        {% endif %}>
        {{ sublink.name | default:sublink.title | escape }}
      </a>
    {% endif %}
  </li>
{% endfor %}
This is the final result:
Conclusion
By customizing Portal entities and existing Web Templates, we are not only making customization to the Portals but also extending its original functionality.
This post idea came after seeing a few questions on the communities about changing the way the menu is rendered. I hope this post encourages you to make changes to the way the menu is rendered OOB.
I recently came across an interesting requirement that I thought would be worth sharing here. Yet again I will be working with Entity Lists, and some implementations will be used from previous posts.
Business Requirement:
Display list of records in the Portal
Allow users to download a document with record details (including child entities)
Document should be (preferably) Word format
The document should also be available in D365
Before we dive into the details, here is a sneak peek of what will be achieved by the end of this post:
To achieve this, I will use the following components:
Web File with the Word icon
Web Page and Entity List for the Contact entity
Entity List actions
View record details
Run Workflow (to generate the Word Document)
Entity Permissions
Custom entity (Application) with the following relationship:
Contact 1:N Application
Word Template against the Contact record, displaying contact details and a list of Applications
Workflow to set generate Word Template against the Contact record
CSS customizations to display my workflow actions as icons
JavaScript code to dynamically create the download button
Implementation
My overall approach for this will be using as much as possible existing D365 features, I won’t write any custom code in D365, only client-side code in the Portals will be necessary.
Web File:
As I want my Entity List to display a Word Icon, I am creating a Web File and uploading the icon from IconFinder.com
I want to use a Word icon for my “Generate Document” workflow action in my entity list, so I am adding one more class to my CSS, this is to set the height and position of my image (you wouldn’t need this if you were using icons within the bootstrap/glyphicon):
The Word document will be generated as a Note attached to my Contact record in D365, for this reason we need to have an entity permission for the Note entity, this is a child entity permission against my Contact entity permission, for more details on parent/child entity permissions please refer to the following documentation: https://docs.microsoft.com/en-us/powerapps/maker/portals/configure/assign-entity-permissions
D365 Application Entity/ Contact Entity
I have a custom entity called Application, with some very simple fields for this demo such as ID, Status, Type and Created On.
Another customization I am making is adding a custom field (Text/URL) in my OOB Contact entity to store the URL of my document, I am calling this “Generated Document URL”.
Finally make sure this URL field is available in your view being displayed on the Portal, in my case the Active Contacts view. Don’t worry, we will hide the column via JavaScript, but this will be important on a later stage.
Word Template
I am using the OOB Word Template feature to generate my document. What I like about this is that we can generate the document manually via D365 or through a workflow, which is perfect for my scenario. For more details on how to create the Word Template please refer to the following: https://docs.microsoft.com/en-us/power-platform/admin/using-word-templates-dynamics-365.
My template will display a logo image, the Contact name and e-mail and a list of the existing Applications.
Workflows
We need two sync workflows to achieve our need. Here I will describe each of the workflow steps:
Generate Word Document
Sync Workflow
Trigger: On-Demand
Entity: Contact
Scope: Organization
Steps:
 - Perform Action: SetWordTemplate (pass the contact record and set the Word Template created as actions parameters)
The SetWordTemplate is an OOB action that creates a note against the record with the generated Word Document.
A note record in your Portal can be accessed via the following URL pattern: <portalurl>/_entity/annotation/<note guid>, so now we need to generate the URL against the Contact record. For this I am creating the below workflow:
Set Contact Generated Document URL
Sync Workflow
Trigger: Record is created
Entity: Note
Scope: Organization
Steps:
 - Validate if the Regarding field of the note is a Contact
 - Validate if the File Name is <your word template name> (you can make better validations, I am going for simple ones for this demo)
 - Now we need the note GUID, to avoid code I am using the D365 Workflow Tools solution: https://github.com/demianrasko/Dynamics-365-Workflow-Tools/blob/master/docs/GetRecordID.md but you could also write your own custom code to retrieve the record GUID
 - The next step is to update the related Contact record with the URL pattern + Note GUID. All we need here is the relative path, no need for the Portal root URL (as this might change between environments or other reasons)
Entity List JavaScript:
At this point we have the core of our development done. If you navigate to your Web Page you should have the Word icon to generate your document, and once triggered, the URL column from your view, once empty, should get populated with the document URL, if you click that URL you should be able to download your document.
Now we need to add a JavaScript logic, attached to the Entity List Load event, that will perform the following actions:
Hide URL column
For each row:
Get the URL from the “Generated Document URL” attribute
If this contains data, create dynamically an element in the same structure as the other elements
Append new element to the workflow links so it will be the last action
The following JavaScript code can be placed in the Entity List custom JavaScript section:
Now after refreshing the cache and your Web Page you should see the below behavior:
Caching Issues?
We all know the Portals have some caching issues, but this shouldn’t be an issue with the above implementation. For any actions triggered by the Portals, the cache is automatically refreshed for that record, as in our scenario we are using sync workflows, the cache gets refreshed within the same transaction.
Conclusion
My example was specific to generate a Word document using a Word Template in D365, but this approach could be used for several other requirements where you have a workflow updating the main record in real-time, and appending a dynamic link to anything on your entity list.
Have you ever had a similar requirement? Please comment below with how you implemented it.
If you find this post useful feel free to like and share it.


